Table of Contents
Using and Interpreting the Screening Model
The Screening Model uses AI to learn from screening decisions within a specific nest, generating inclusion probabilities based on configuration.
You may use the screening model in two ways:
- Generate inclusion probabilities to be displayed on records and assist in your own manual screening.
- Dual modes only: Turn on Robot Screener to replace an expert reviewer, which makes decisions based on these probabilities.
Both methods require the model to be trained but the first only displays probabilities, allowing you to order studies in the screening queue by likelihood of inclusion or bulk screen studies by inclusion probability. Whereas Robot Screener actively takes the place of a second reviewer, and hides the probabilities for the remaining reviewers by default.
The below guidance is specifically for inclusion probability generation, see our Robot Screener page for more specifics on that part of the tool.
Generating Inclusion Probabilities
You may generate inclusion probabilities in any Screening mode but it's important to note at what stage they are generated and the language used:
- Standard Mode: Inclusion Probabilities are generated in the singular round of Screening.
- Two Pass Mode: Advancement Probabilities are generated in the Title/Abstract round of Screening only.
Settings
Manual vs. Automatic
By default, the Screening Model will be on Manual, meaning that it will only run when a user selects Train Screening Model during the Screening process.

For Automatic Training, head to Nest Settings–> Screening Model. This will cause the Model to run as soon as a sufficient number of studies are screened, and this Model will be re-run automatically as more screening occurs.

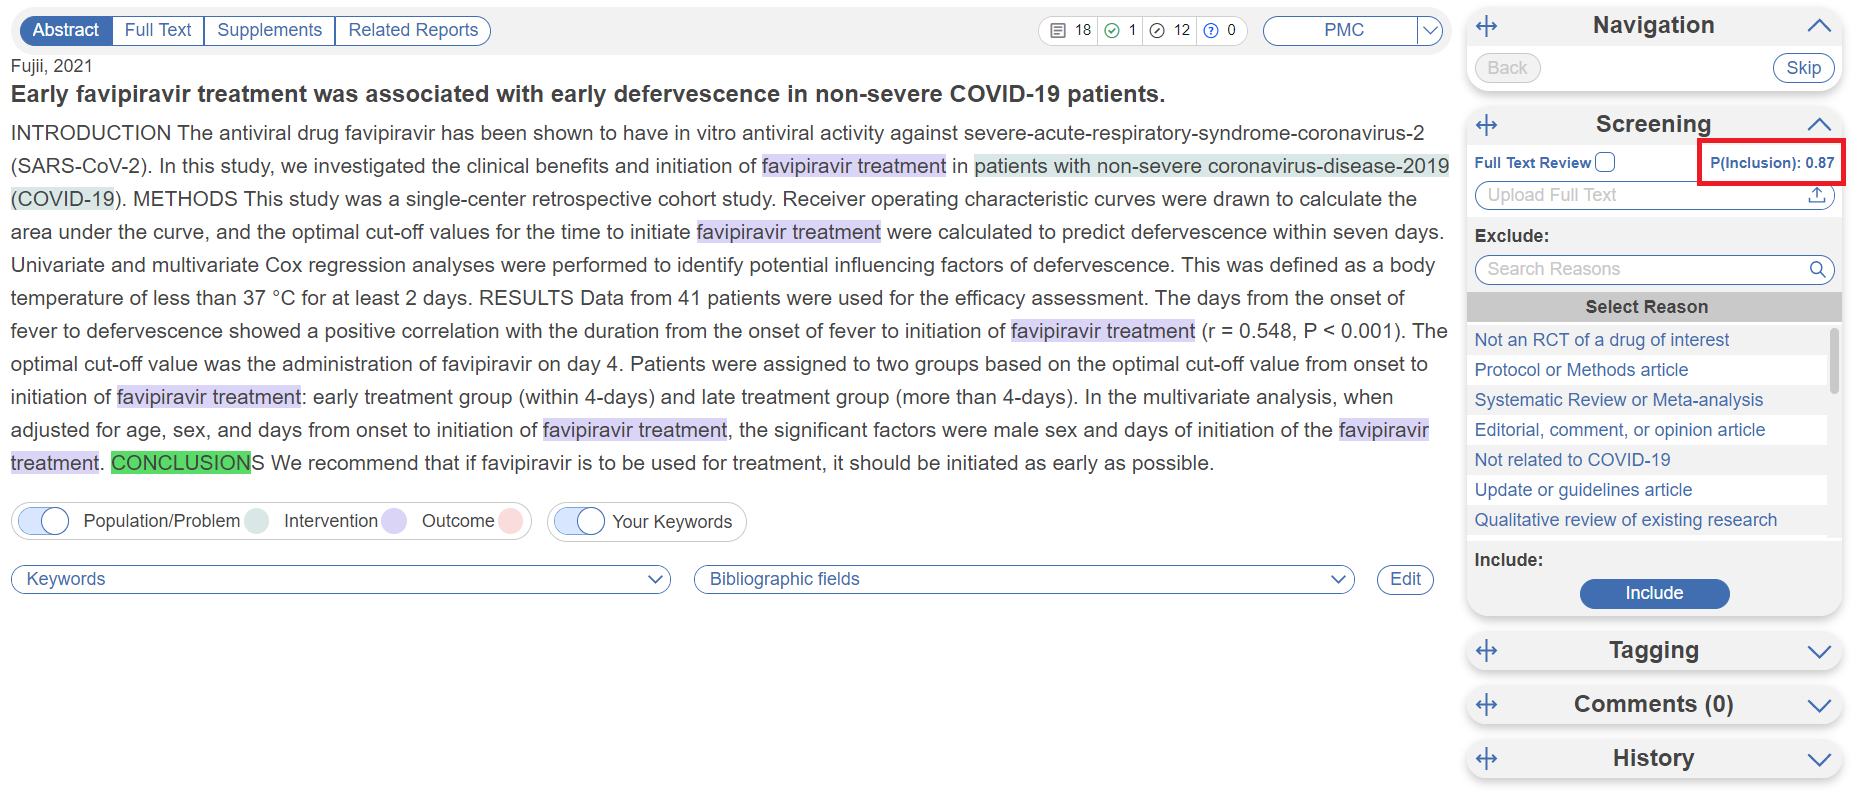
As probabilities are generated, they are displayed in place of the “Train Screening Model” text in the Screening module, in the below case it is “P(Inclusion): 0.87.”.

Displayed vs. Hidden
By default, inclusion probabilities will be displayed, meaning that any user will be able to see the probabilities on the Screening panel. If you wish for them to be hidden, head to Nest Settings –> Blinding –> Hide Probabilities.

Training the Model
Before the model can be turned on, you must screen 50 studies and advance/include 10 studies. If in Two Pass, this is at the Abstract stage. If in a Dual mode, these must be final adjudicated screening decisions (2 human reviewers and 1 human adjudicator)
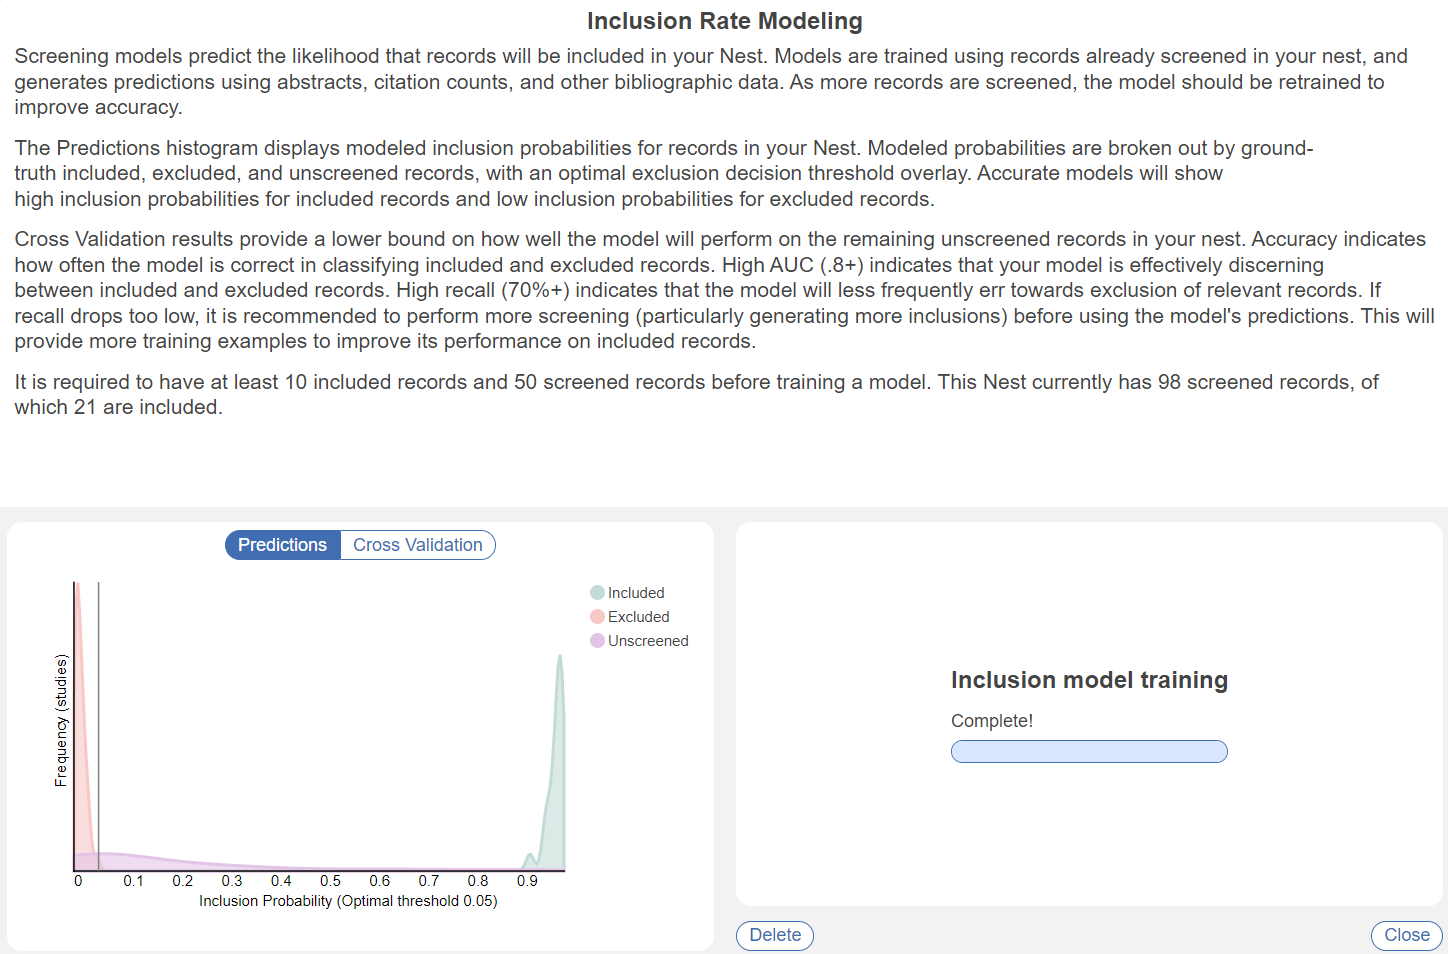
After the threshold is met, you can either manually train the model, or the automatic training will kick in. In Automatic Training, the model updates after every 10 studies have final decisions applied. You can check the progress of the screening model by selecting the P(Advancement/Inclusion) value displayed, or in Settings –> Screening Model–> View Screening Model.
Interpreting the Model
Once the Model is trained, you should see a graph where Included or Advanced, Excluded, and Unscreened records are represented by green, red, and purple curves, respectively:

Odds of inclusion/advancement are presented on the x-axis (ranging from 0 to 1). Since the Model is trained on a nest-by-nest basis, its accuracy ranges based on how many records it can train on and how many patterns it can find in inclusion activities.
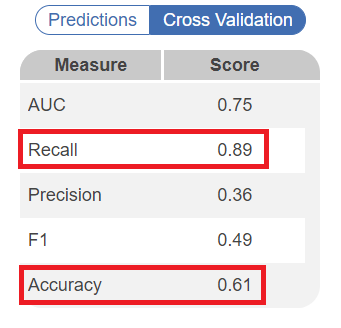
You can see the accuracy in the modal after the model is trained. In the Cross Validation tab, several statistics are shown. Scores of Recall and Accuracy can be used to interpret how the model will perform on the remaining records. High recall (0.7/70%+) indicates that the model will less frequently exclude relevant records, meaning higher performance. Similarly, accuracy indicates how correct the model's decisions are compared to already screened records, and thus how it is likely to fare on upcoming records. See below for an example of a relatively well trained model:

Implications for Screening
Inclusion Probability generated from the Screening model is also available as a filter in Inspector, which can assist with finding records based on their chance of inclusion/advancement. Bulk Actions can also be taken at your discretion, but ensure that you are careful in excluding studies if you have not reviewed their Abstracts at least!
Model Performance
Our Philosophy
Screening is a complex task that relies on human expertise. Our model may stumble due to:
- Insufficient training examples (usually included/advanced records) to learn from
- Data not available to the model (e.g. screening with a full text article, missing abstract)
- Weak signal amongst available predictors against protocol
For these reasons, we recommend using the model to augment your screening workflow, not fully automate it.
How can it augment your screening?
- Excluding clearly low-relevancy records
- Raising high relevancy records to reviewers
Our model errs towards including/advancing irrelevant records over excluding relevant records. In statistical terminology, the model aims to achieve high recall. In a review, it is far more costly to exclude a relevant study. Once excluded, reviewers are unlikely to reconsider a record. In contrast, an included/advanced study will be revisited multiple times later in the review, more readily allowing an incorrect include/advance decision to be corrected.
Testing out the model
In an internal study, Nested Knowledge ran the model across several hundred SLR projects, finding the following cumulative accuracy statistics:
Standard Screening
- Area Under the [Receiver Operating Characteristic] Curve (AUC): 0.88
- Classification Accuracy: 0.92
- Recall: 0.76
- Precision: 0.40
- F1: 0.51
Two Pass Screening
In two pass screening, the model predicts advancement of a record from abstract screening to full text screening. Given that advancement rates are typically higher than inclusion rates, the model has more positive training examples, and demonstrates improved recall.
- AUC: 0.88
- Classification Accuracy: 0.93
- Recall: 0.81
- Precision: 0.44
- F1: 0.56
Following our philosophy, recall is relatively higher than precision: the model suggests inclusion/advancement of a larger amount of relevant records, at the cost of suggesting inclusion of some irrelevant records. Due to class imbalance, the model scores a 90%+ classification accuracy, predominantly consisting of correct exclusion suggestions.
For comparison purposes, our study found human reviewer recall (relative to the adjudicated decision) was 85% in the average nest. Our models are within 4 & 9 points of human performance on this most critical measure.
Analyzing Your Nest
When you train a new model, we generate k-fold cross validation performance measures using the same model hyperparameters the final model is trained with. These performance measures typically provide a lower bound on the performance you can expect from the model on records not yet screened in your nest. High recall (70%+) suggests that your review is less likely to be missing relevant records at the end of screening. High AUC (.8+) suggests that your model is effectively discerning between included and excluded records.
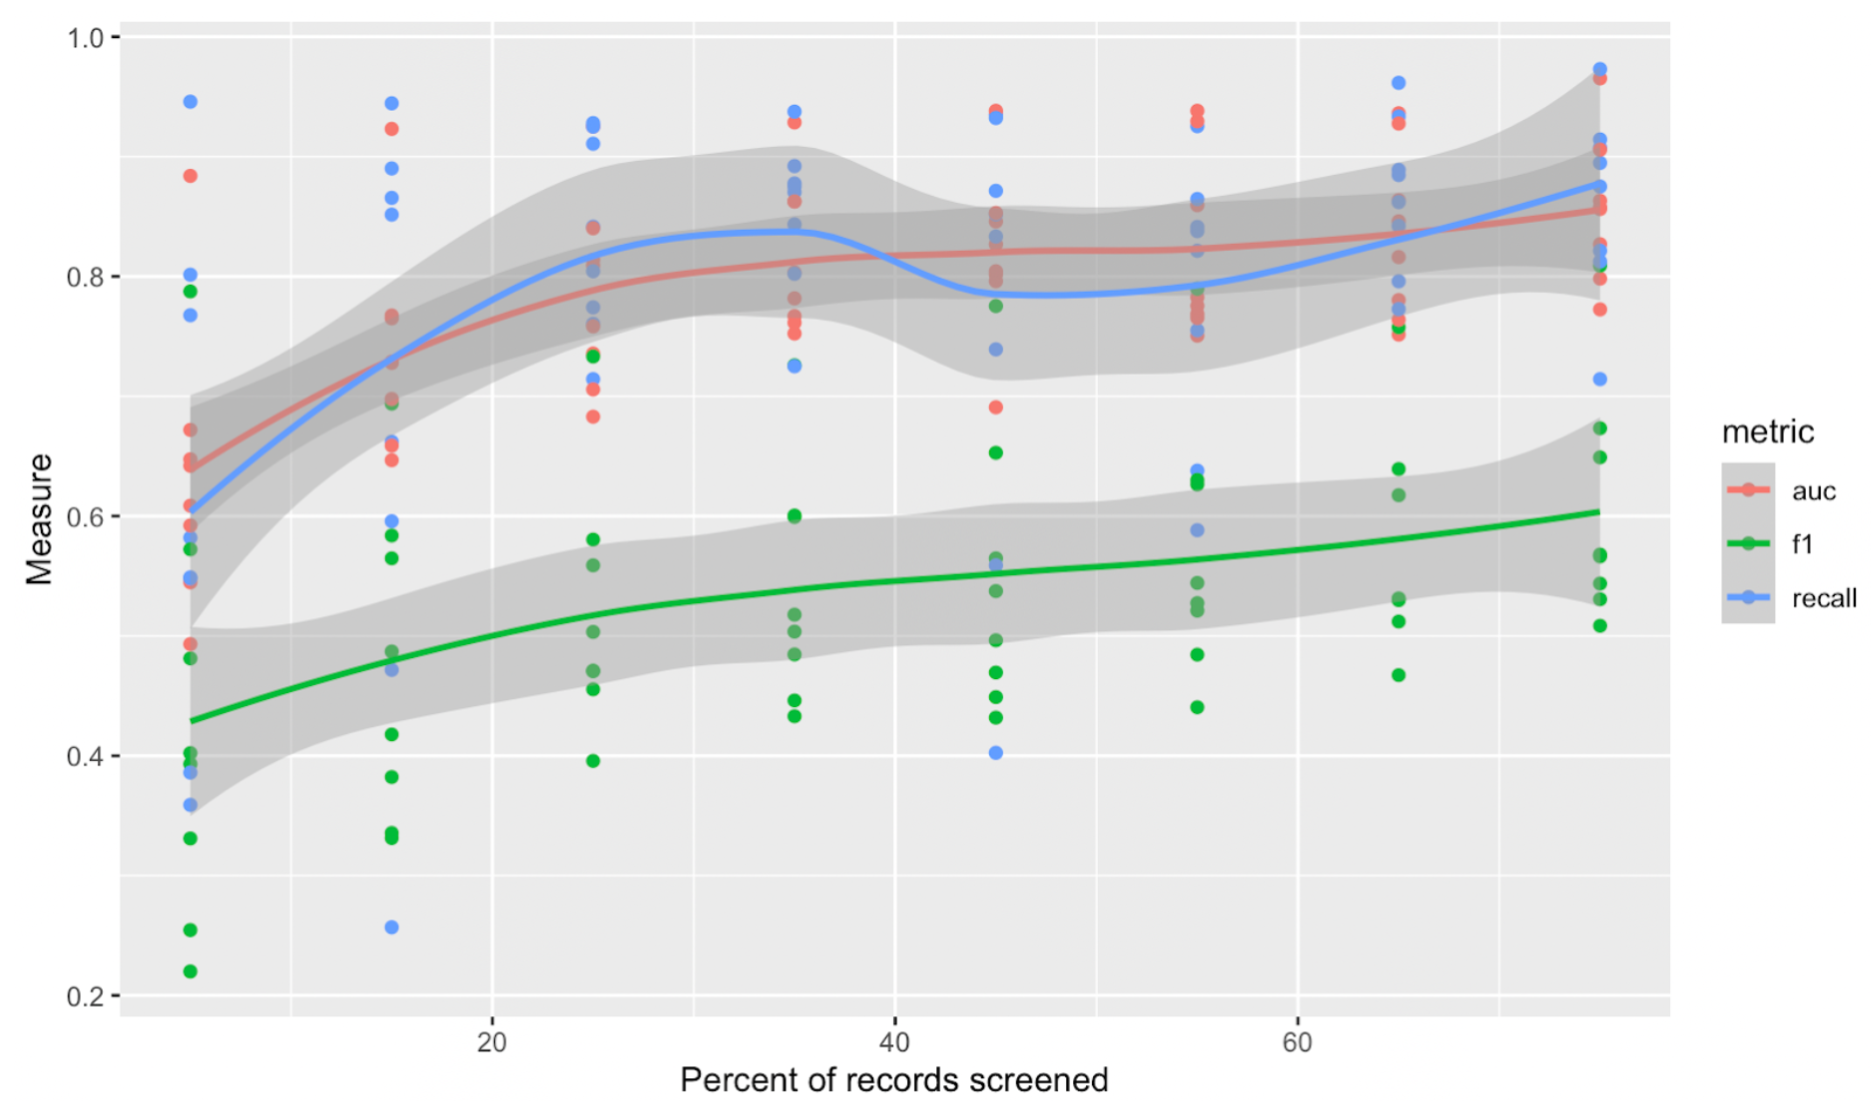
While we cannot guarantee performance improvement, below is some rough empirical data for how you might expect performance measures to improve as you screen more records in your nest.
Timing of Model Training
In general, as you screen more records, the better the model will perform. Of course, you want to use the model before you’ve screened every record!
To provide the model with sufficient information to begin understanding your review, we require 50 total screens and 10 inclusions/advancements. At that point, we recommend checking model performance (see above) to evaluate performance.
As the graph below shows, AUC and recall can grow on a relatively sharp curve early in your review. The curve begins to flatten around 20-30% of records screened, which is where we typically begin to recommend the use of Robot Screener in Dual screening modes.

How the Screening Model Works
At a high level, the model is a Decision Tree- a series of Yes/No questions about characteristics of records that lead to different probabilities of inclusion/advancement.
In more detail, the model is a gradient-boosted decision tree ensemble. Its hyperparameters, particularly around model complexity (number of trees, tree depth) are optimized using a cross validation grid search. The model produces posterior probabilities and is optimized on logistic loss. SMOTE oversampling is employed as a correction to highly imbalanced classes frequently seen in screening.
What data does the model use?
The model uses the following data from your records as inputs:
- Bibliographic data
- Time since publication of the record
- Page count
- Keywords/Descriptors
- Abstract Content
- N-grams
- OpenAI text embedding (ada-002)
- Citation Counts from Scite, accessed using the DOI
- Number of citing publications
- Number of supporting citation statements
- Number of contrasting citation statements
Often some of this data will be missing for records; it is imputed as if the record is approximately typical to other records in the nest.