Table of Contents
Configuring and Editing the Tag Hierarchy
For each nest, you need to configure a Tag Hierarchy before tagging that nest's records. Tag Hierarchies structure the qualitative content that you tag, and Qualitative Synthesis uses the Tag Hierarchy as the basis for its structure.
To configure a hierarchy for your nest, follow the steps below. Once you have built the hierarchy, you can move on to tagging records you have included in your nest.
Before Tag Hierarchy configuration, consider the mode you would like to use. By default, your nest has Form-based Tagging mode on, allowing you to configure questions and answers to be extracted in a form.
Alternatively, you can switch to Standard mode, which is less structured and allows you to configure concepts to be extracted via a list of dropdown tags. Follow these instructions on configuring tags in Standard Tagging mode. Note: switching between modes results in no loss of data.
Understanding Tags in the Hierarchy
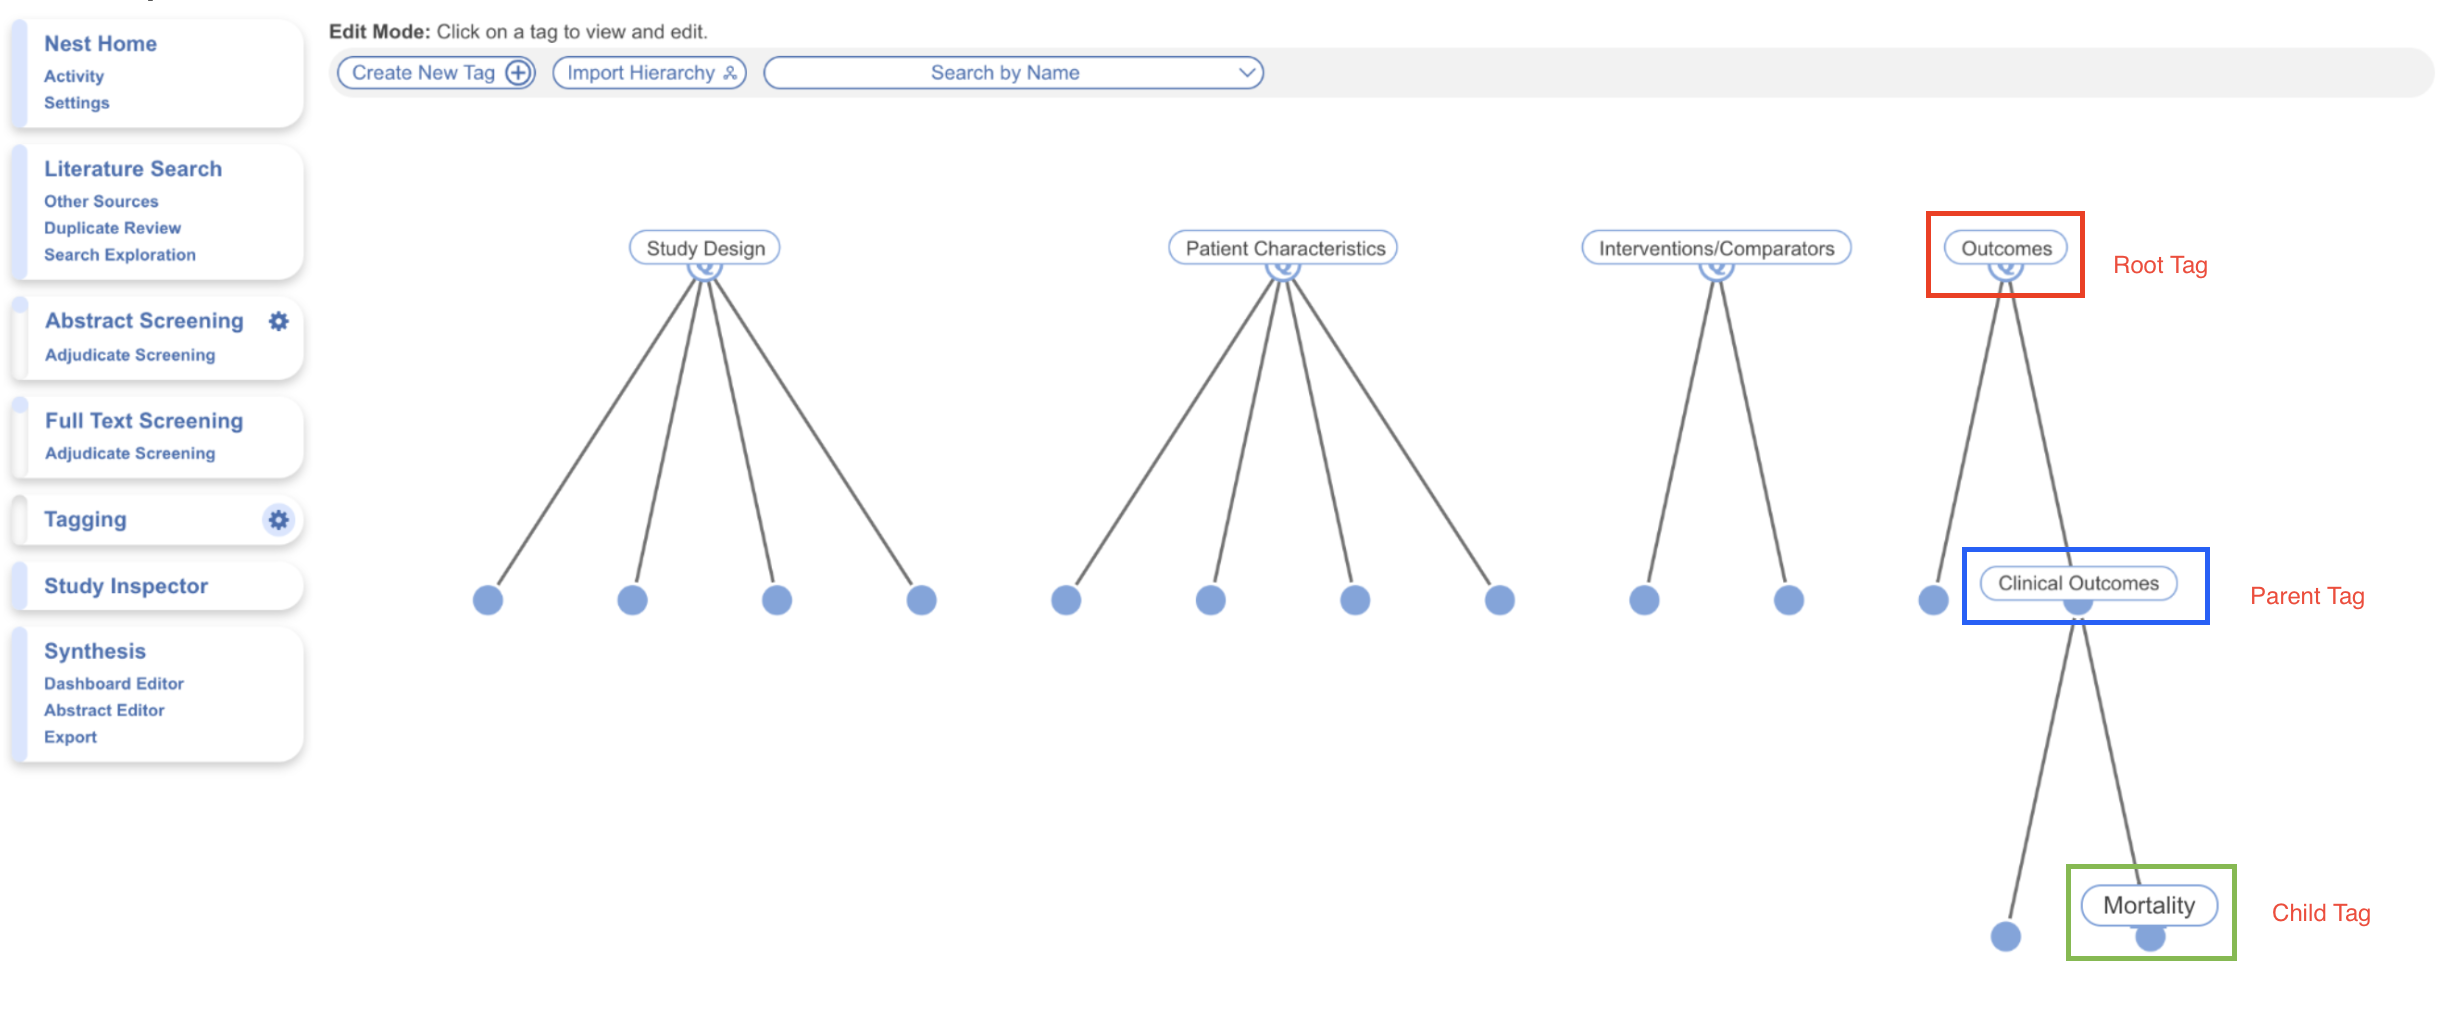
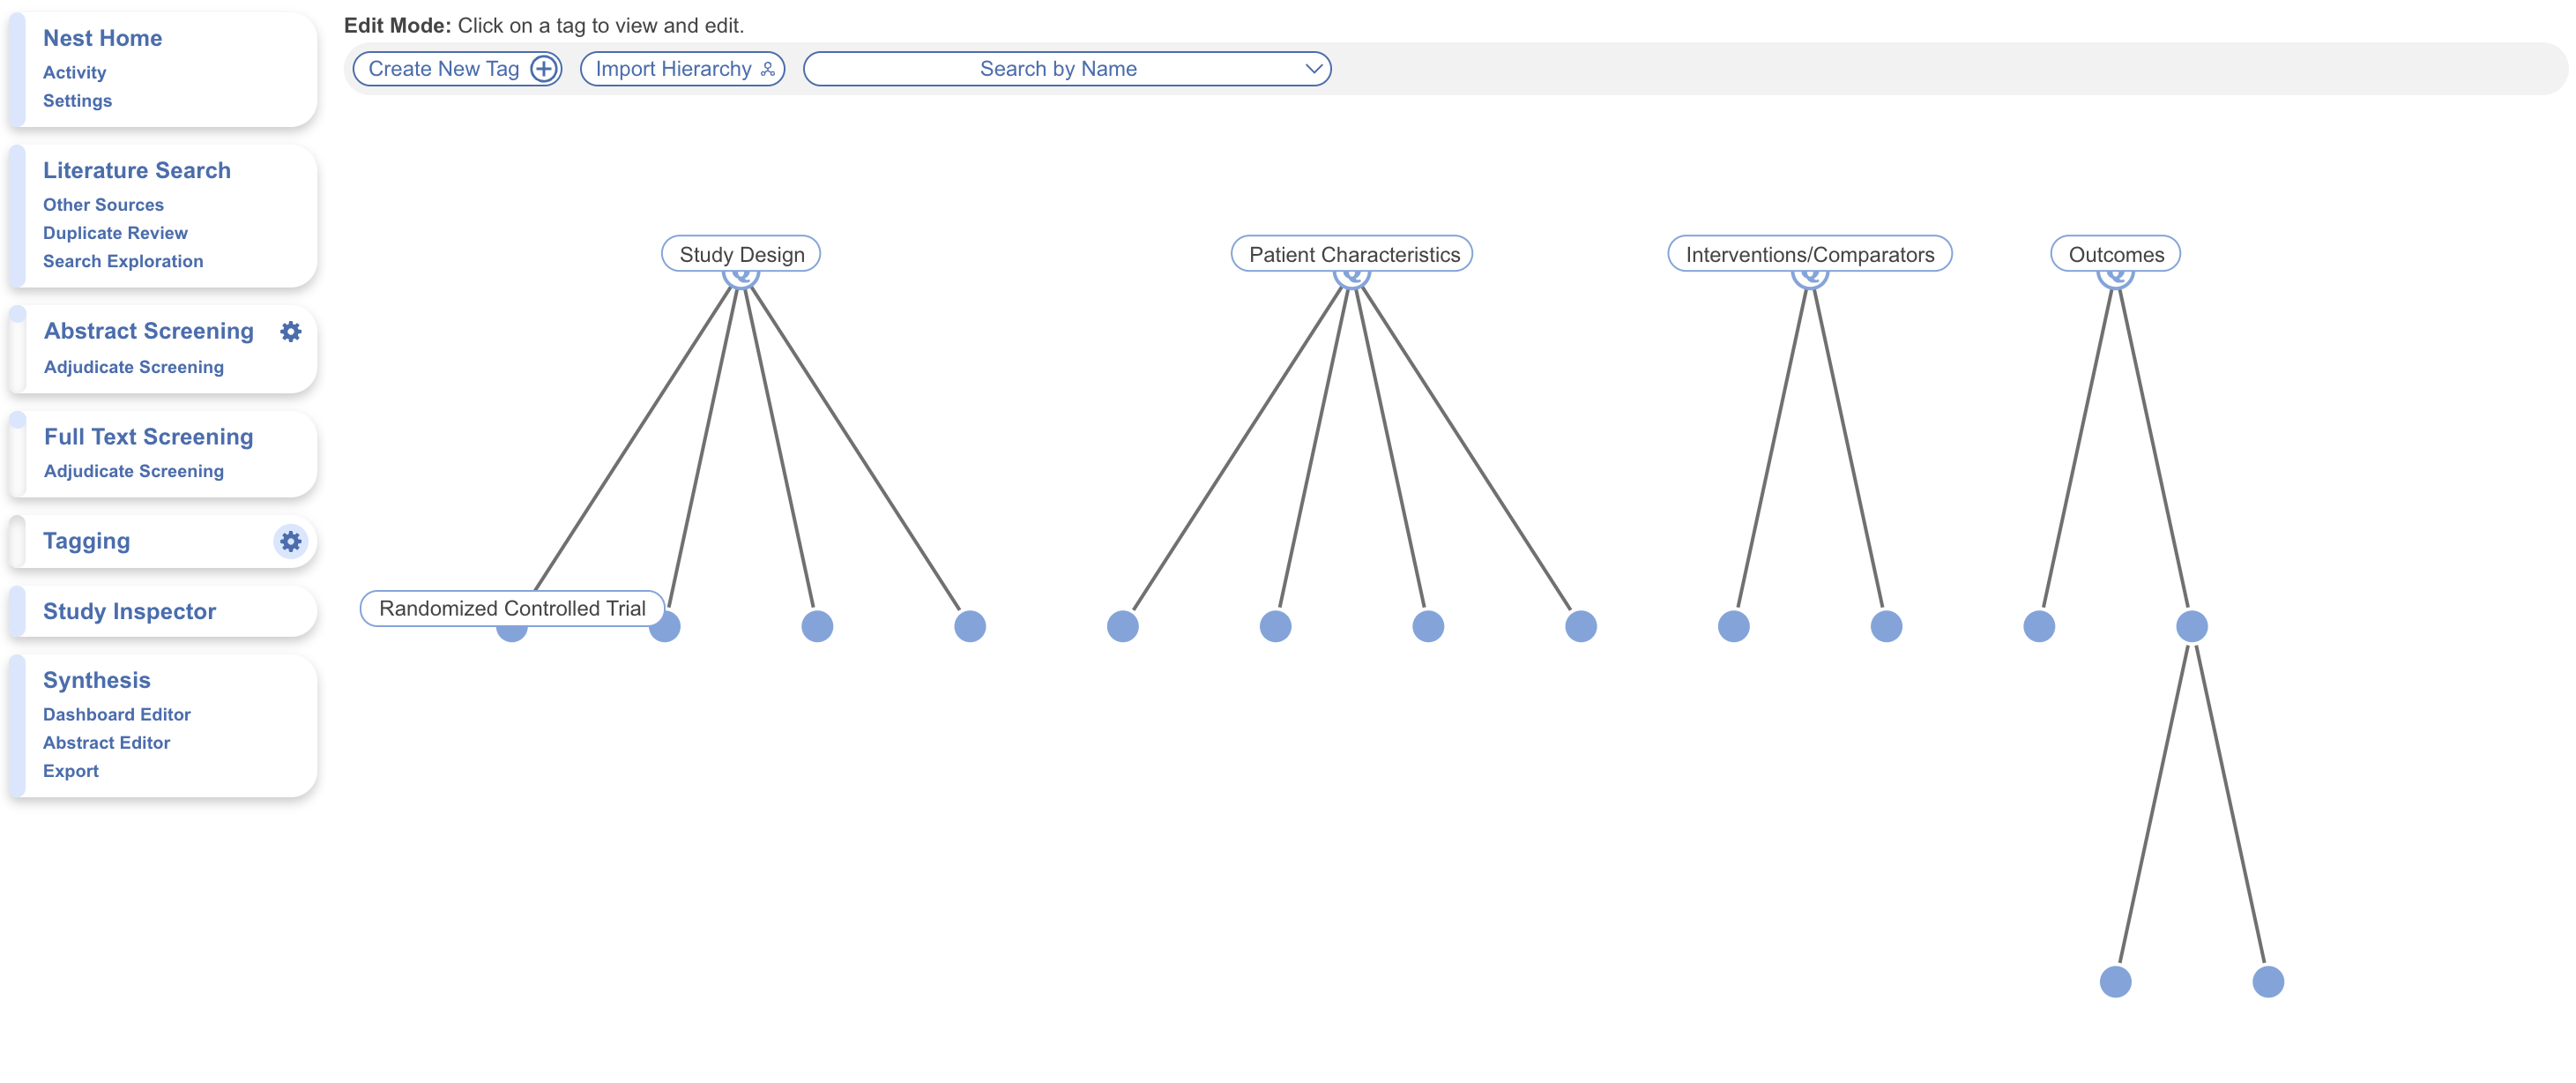
Root Tags are the highest level of the hierarchy, and have no parent tags.
Parent tags are any tags that have child tags. In the below example, “Outcomes” is a root tag (the highest level) and a parent tag to “Clinical Outcomes,” “Clinical Outcomes” is a parent tag to “Mortality” (but not a root tag), and “Mortality” is a child tag (but not a parent or root tag).
That said, don't worry too much about the jargon, these ontologies are simply supposed to represent the most general categories at the top, and most specific at the bottom.
Configure Study Tags as Questions & Answers
1. Navigate to Configure Tags
Click on the gears icon in the Tagging tab:
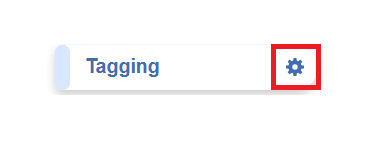
This will bring you to the Tag Hierarchy, which will be blank until you have added tags.
2. Configure Tag Questions
To draft Questions, you need to build out the Tags in your Tagging Hierarchy. You should keep in mind what tags will be Questions and which will be answers.
To start, click “Create New Tag” and give the tag a name. Select a question type from the dropdown depending on the question type.
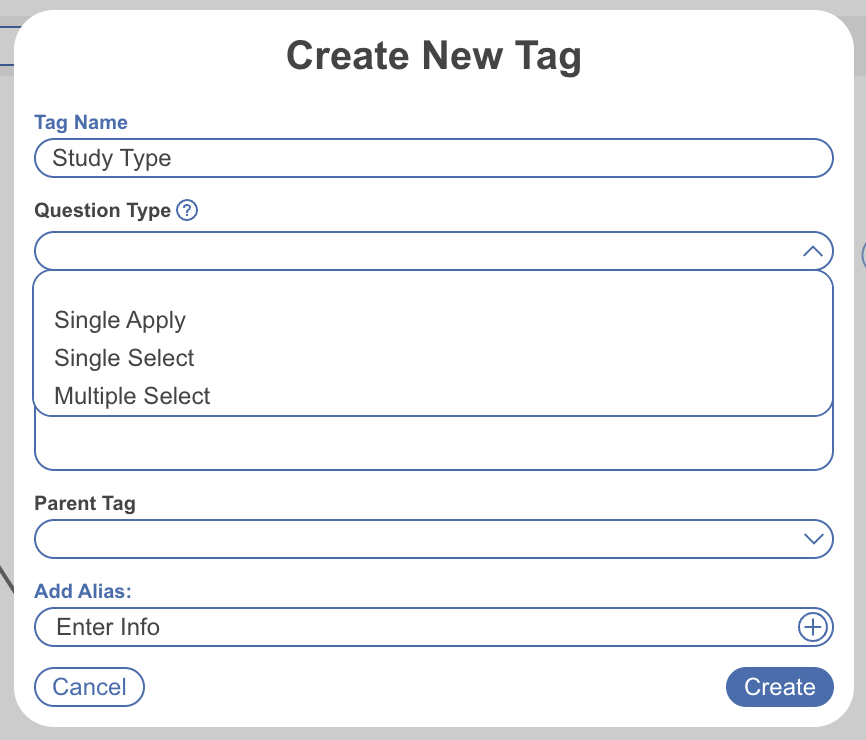
You have the following options for Question types:
- Single Select: All child tags will be shown as an option where only a single answer can be selected,
- Multi-Select: All child tags will be shown as an option where multiple answers can be selected, or
- Single Apply: Open-ended question type where only a text box is shown, answering the question applies the tag, indicating the concept is present.
Generally, it is best to add a full/descriptive question (such as, if you had a tag called Study Type, type out the question “What was the study type of the article?” in the Question box).
Note: Leaving “Parent Tag” blank, keeps the tag at the top of the hierarchy (root tag).
3. Configure Tag Answers
Single Apply questions do not require tag answers but for Single Select and Multiple Select Questions, they require tag answers to work.
Follow the same process as above via Create New Tag, input the answer as the Tag Name, leave the question type blank, add a description if applicable, click the Parent Tag dropdown and select the tag the answer belongs under.
Example Questions of each type
Example Single Select question:
- Tag Name: Study Type
- Question: What was the Study Type?
- Answers (child tags): Randomized Controlled Trial, Prospective Cohort Study, Retrospective Study
Example Multi-Select question:
- Tag Name: Comorbidities
- Question: What comorbidities were reported in the patient population?
- Answers (child tags): Diabetes, Hypertension, Chronic Kidney Disease
Example Single Apply question:
- Tag Name: Study Objective
- Question: What was the study objective reported?
- Answer (not child tags, the answer will be reflected by the tag text): Tag Text/Excerpt from the underlying study. Absence of an answer means the Tag is not present in the study.
Tips on Preliminary Hierarchy Organization
Every Question that you create will be presented to users during the Tagging stage, in order of (in the hierarchy) left to right. See instructions below on reordering tags.
In addition, due to the flexibility of tags, it can be helpful to create root and parent tags to organize your configured questions.
Import a Tag Hierarchy Template
When creating a hierarchy from scratch it can be helpful to use a template. You can either import one of our public templates or a pre-built template that belongs to your organization.
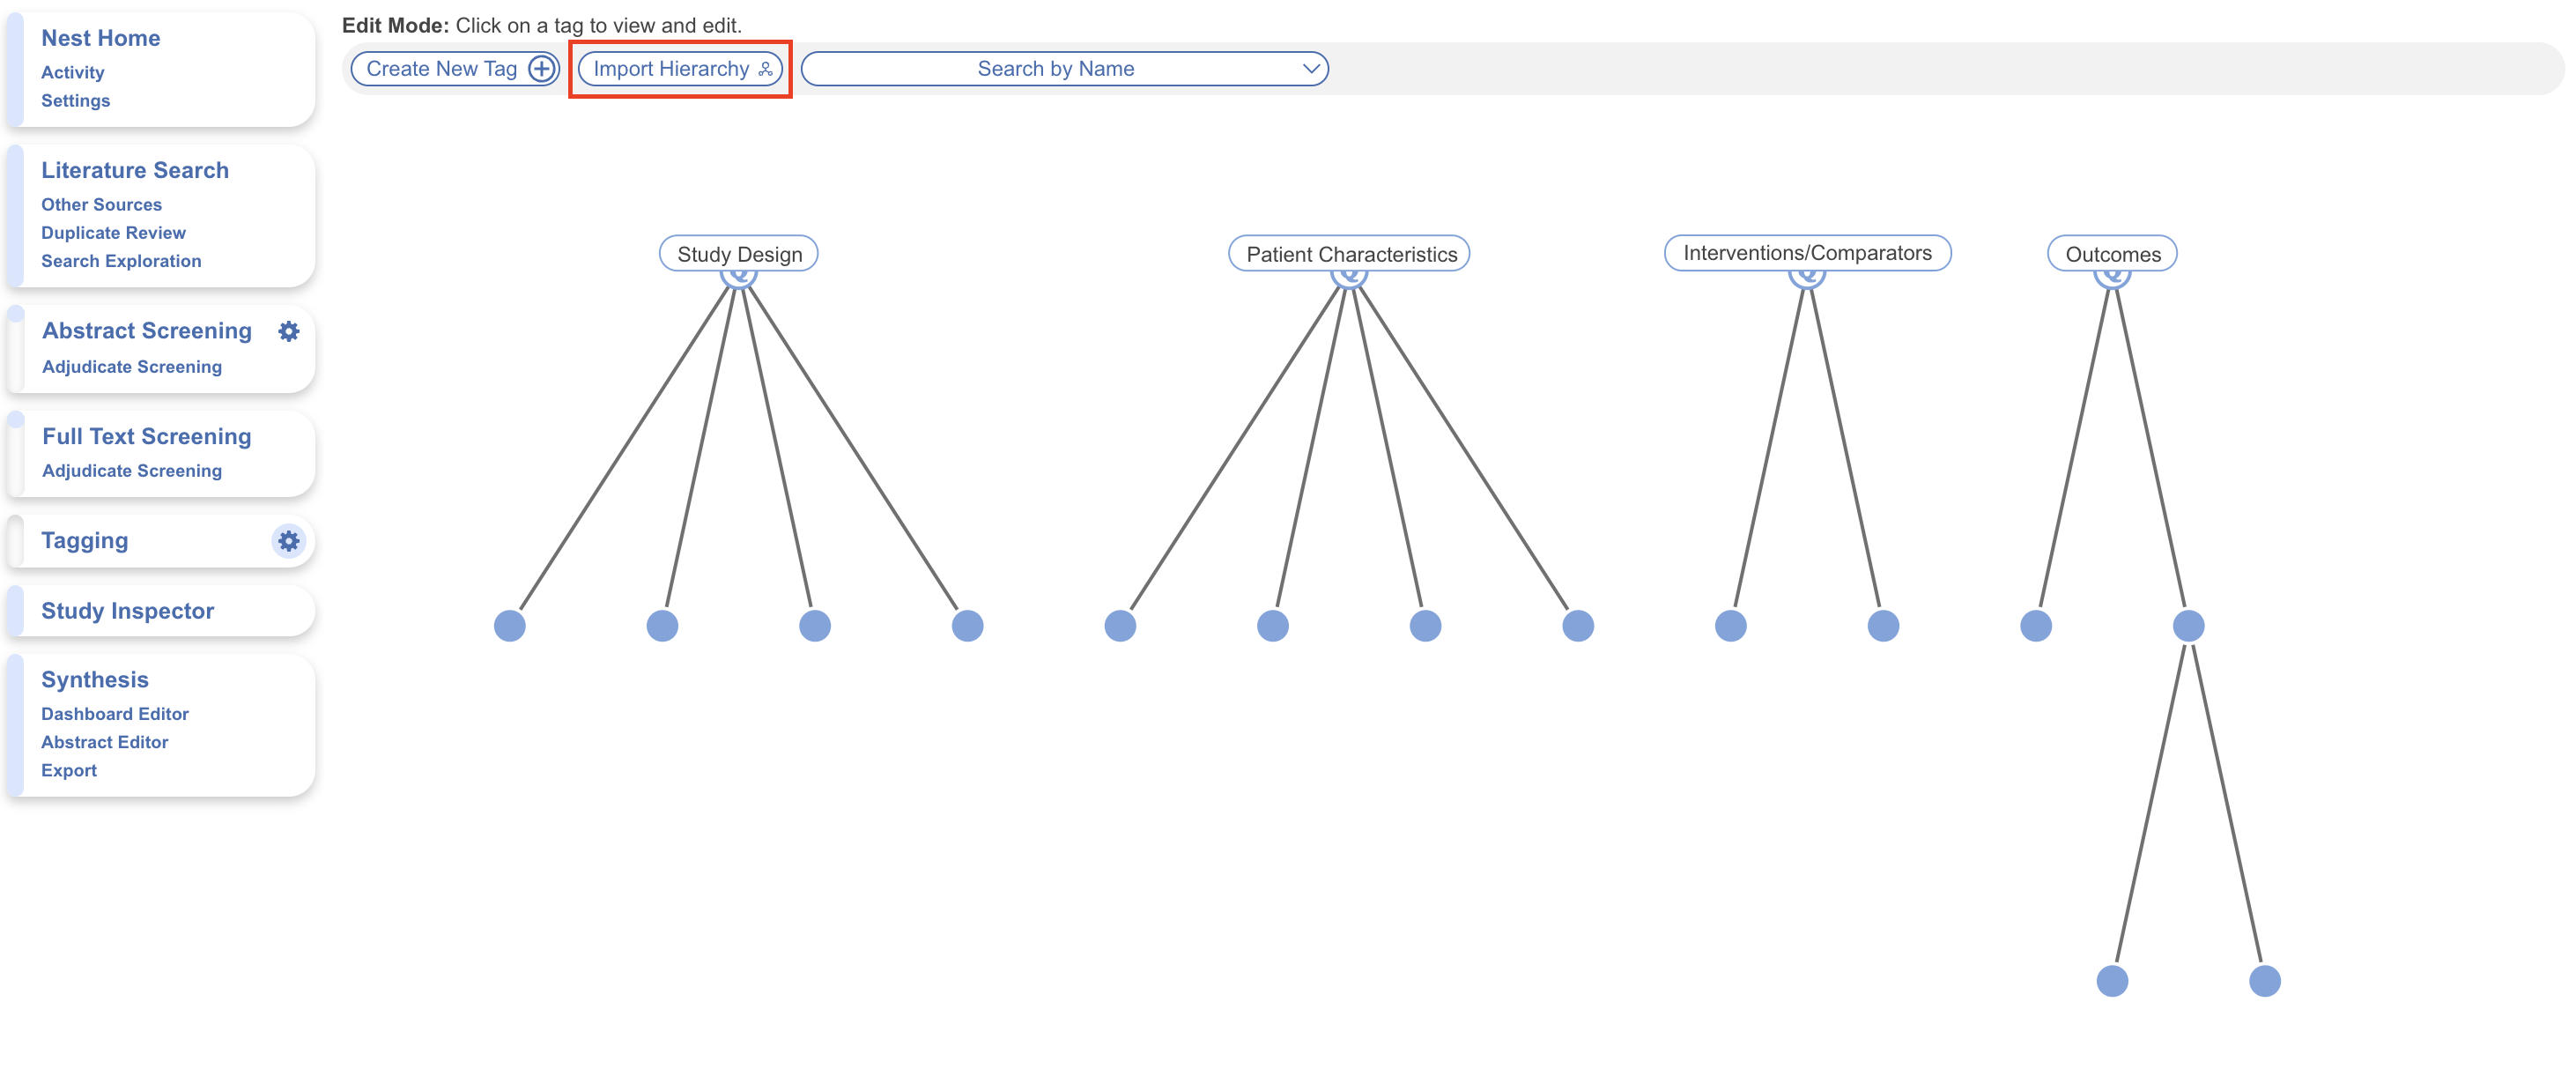
1. Click "Import Hierarchy"
From the Configure Tagging page, select “Import Hierarchy”
2. Choose a Tag Hierarchy Template
When importing a tag hierarchy, you have the option to import:
- From your organization's configured templates
- From Nested Knowledge's public templates
Learn more on how to import tag templates here.
How to build a Tag Hierarchy Template
To learn how to build a Tag Hierarchy Template for your Organization, click here.
3. Import a Hierarchy or Root Tag
Then, decide if you want to import the entire hierarchy or only one Root Tag and its children. For the whole hierarchy click “Import.”
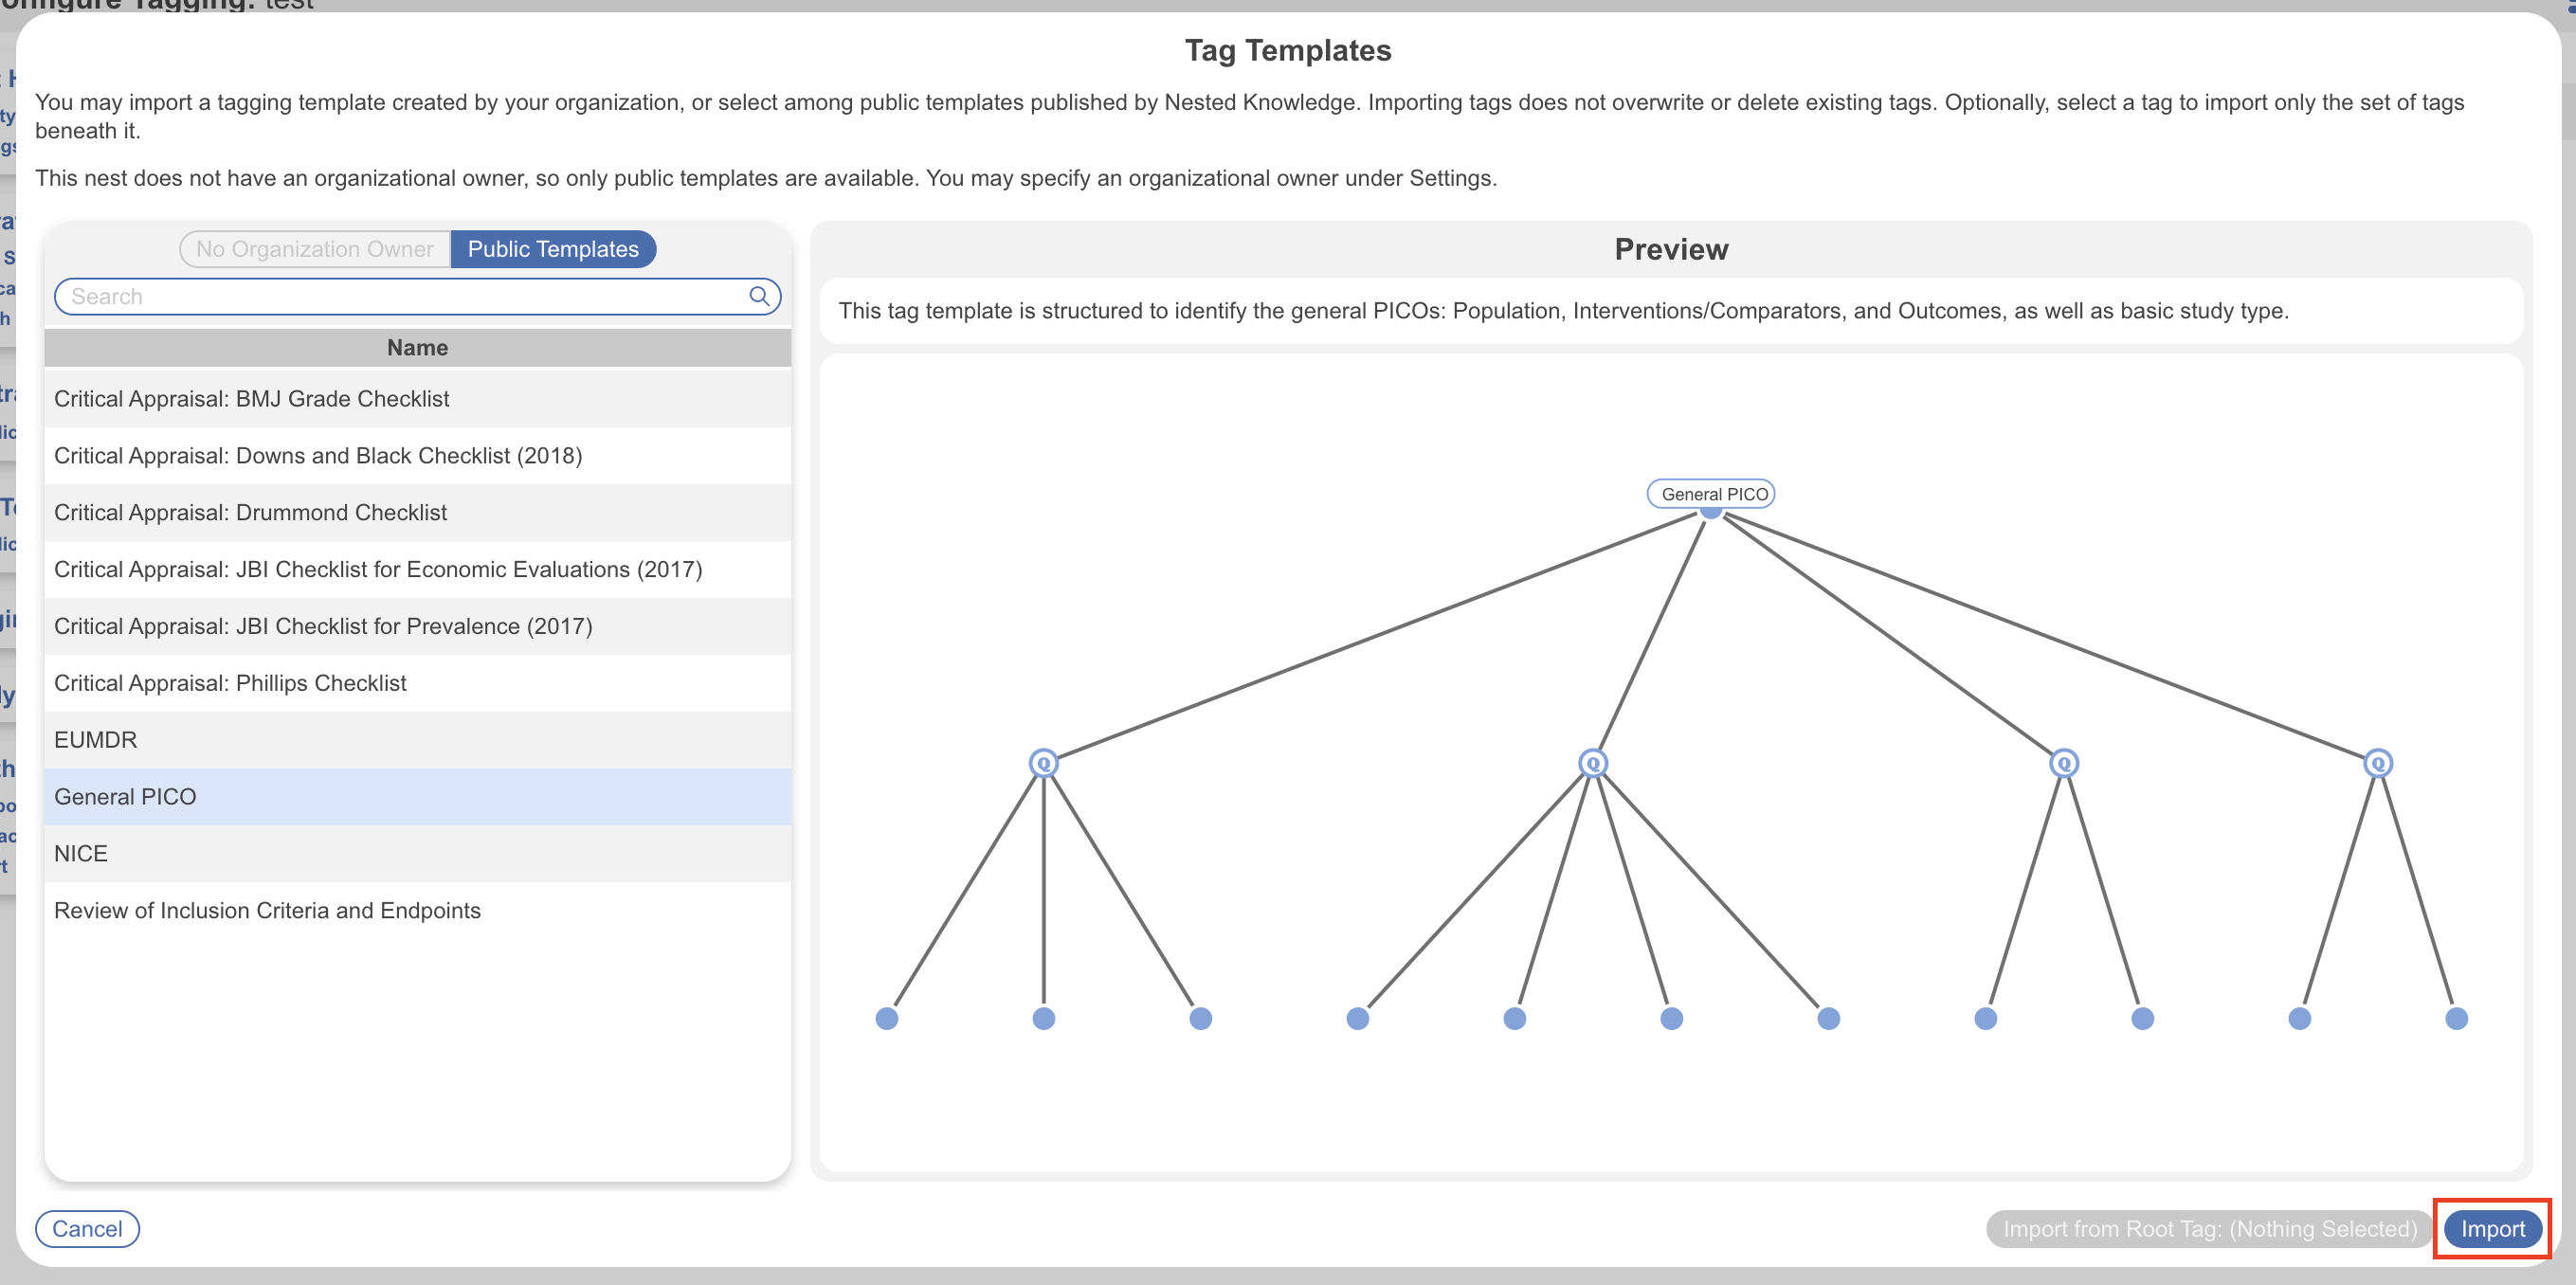
To select only one Root Tag and its children, select the Root Tag and then click “Import from Root Tag.”
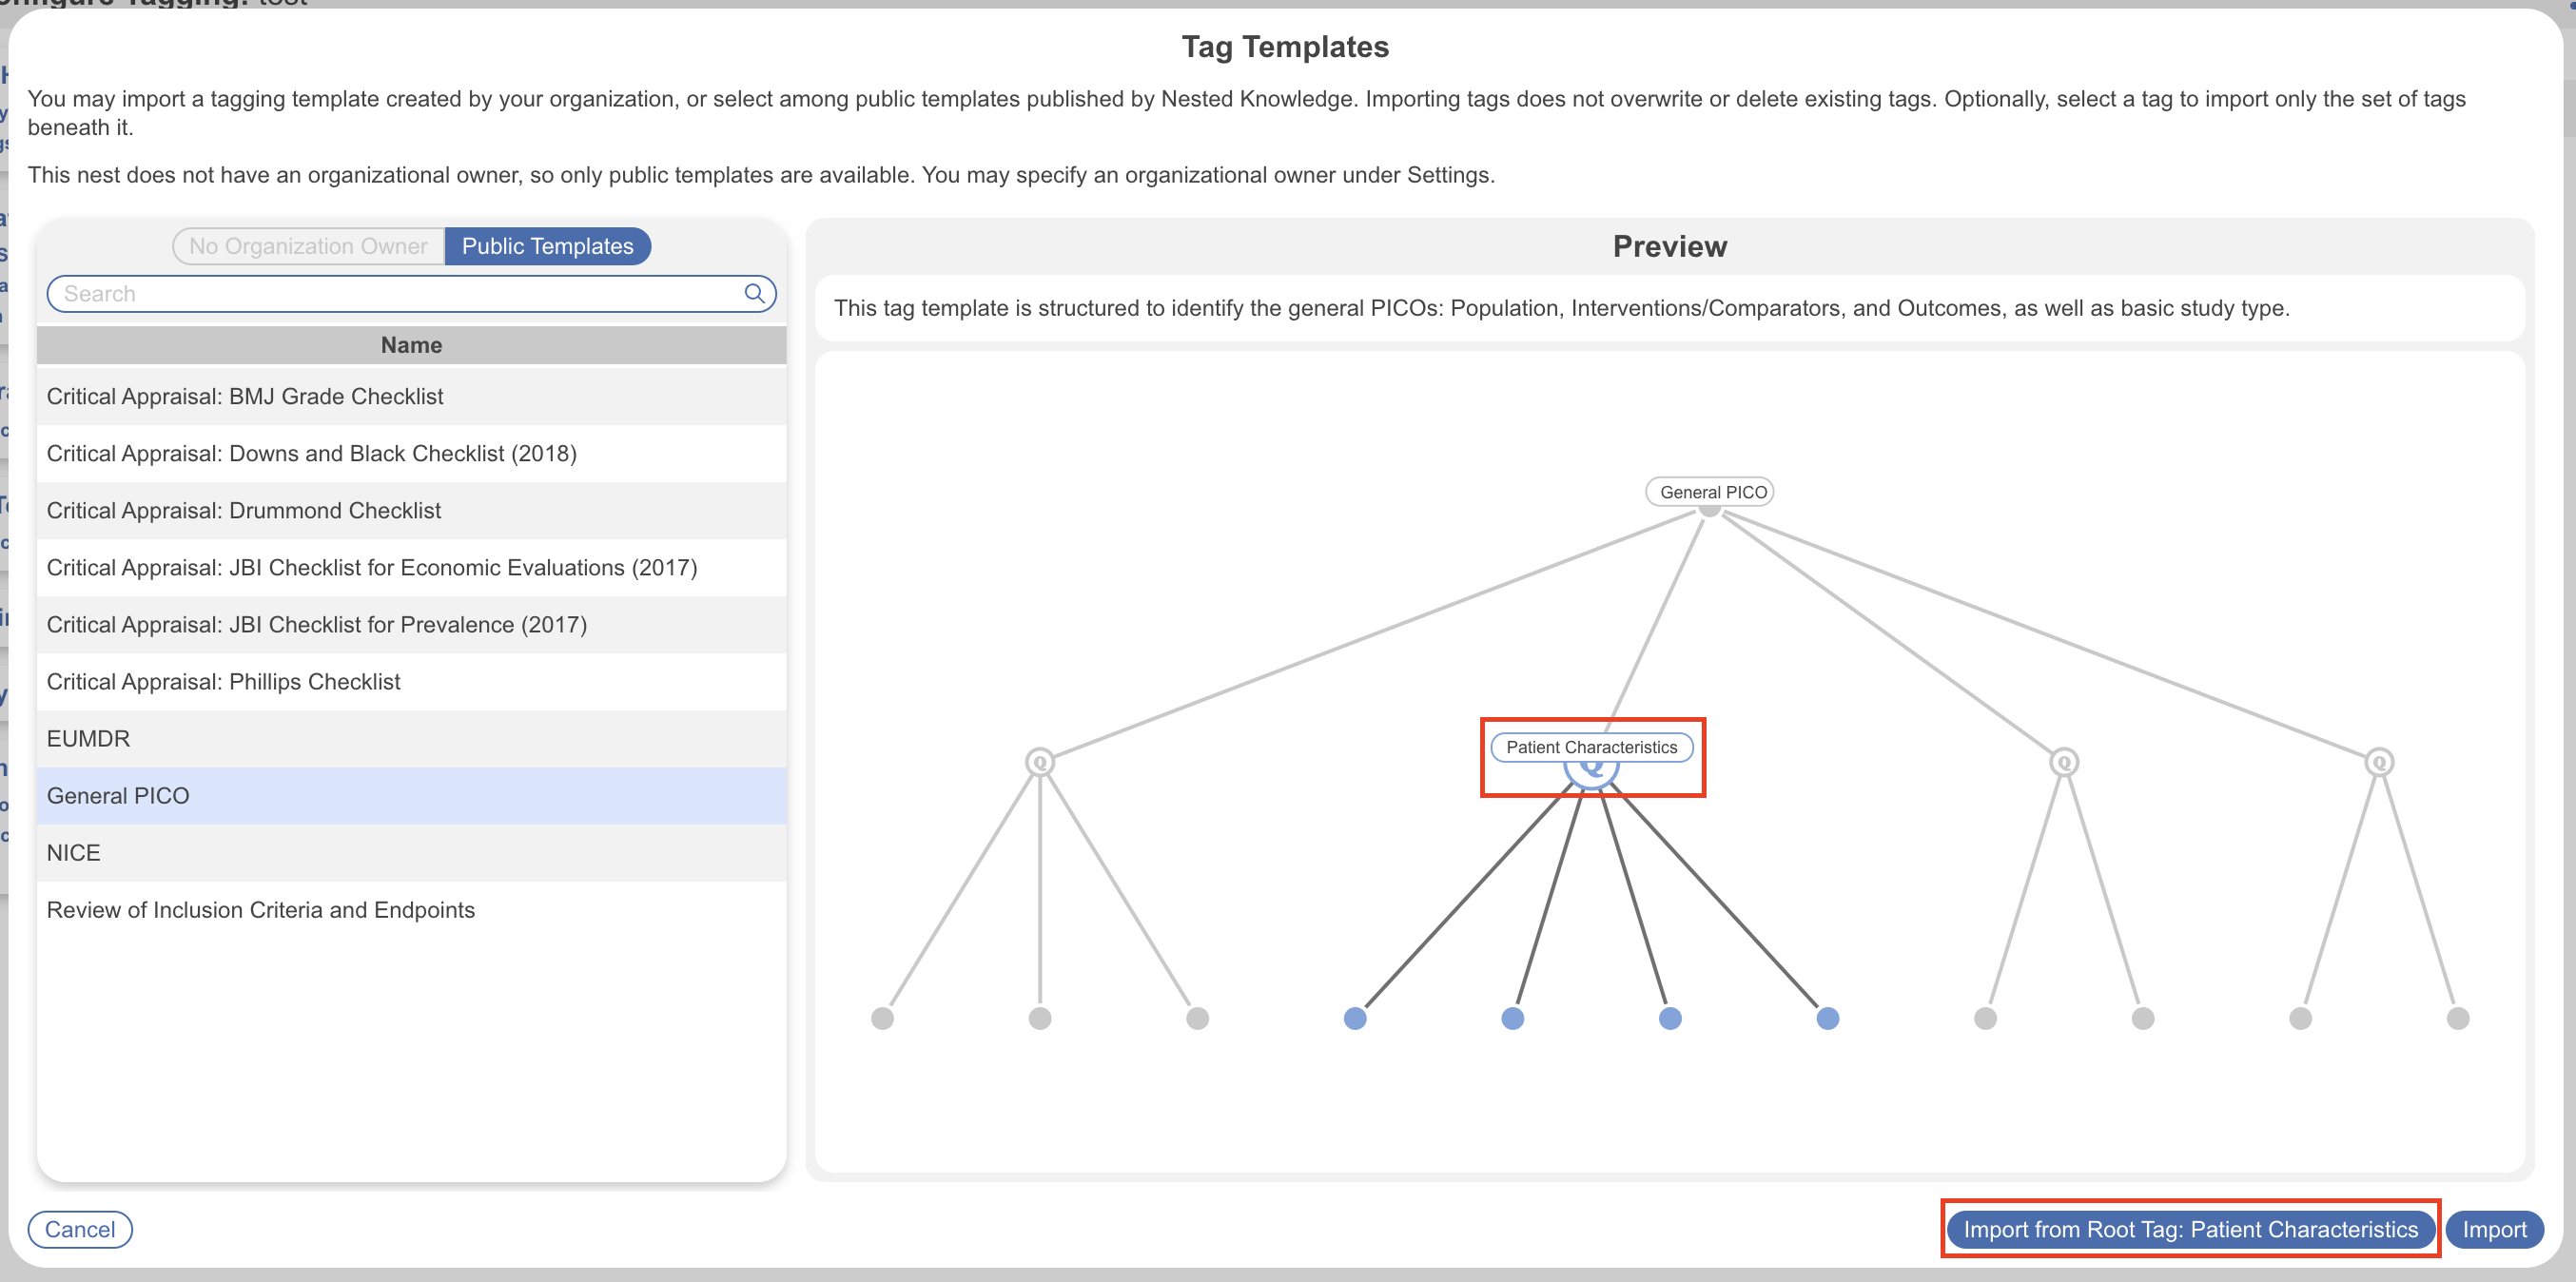
Note: If tags are already present in your Hierarchy, the imported hierarchy will be added to the right of the existing Root Tags.
Editing the Tag Hierarchy:
After you've begun Tagging, you may want to edit the tags you have created. Here are the edit functions that are available on the Configure Tagging page:
The fewer tags you create, the easier it will be to tag underlying studies. Only create the tags that are essential to your Qualitative Synthesis!
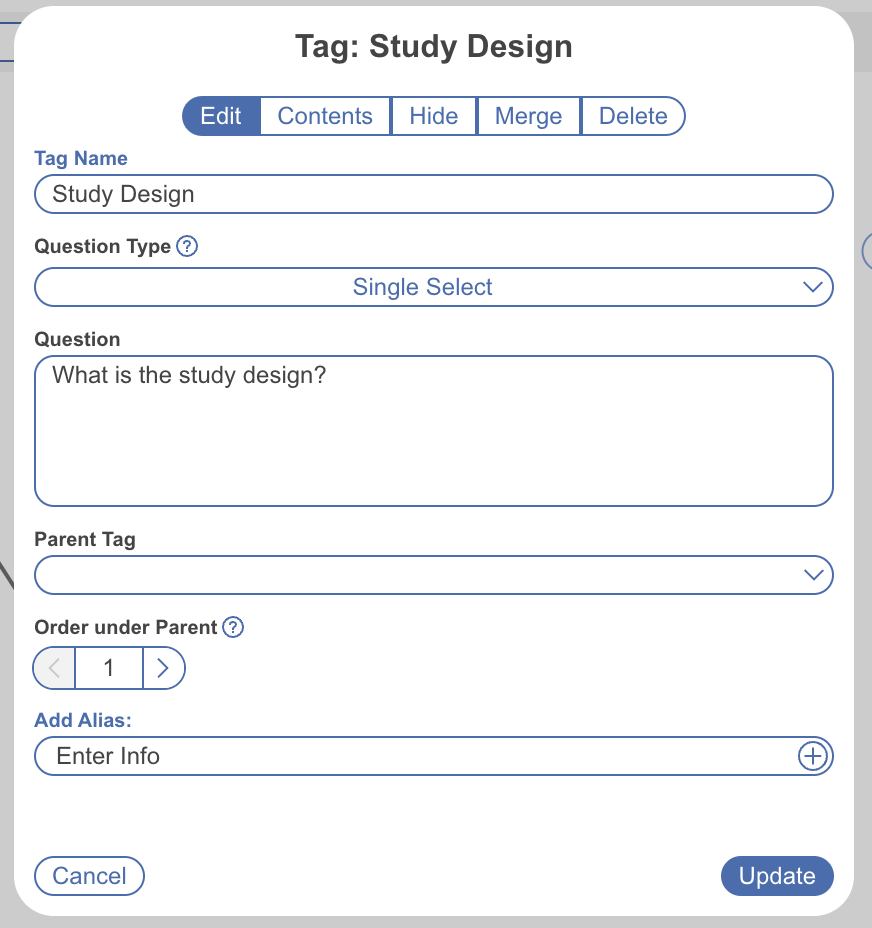
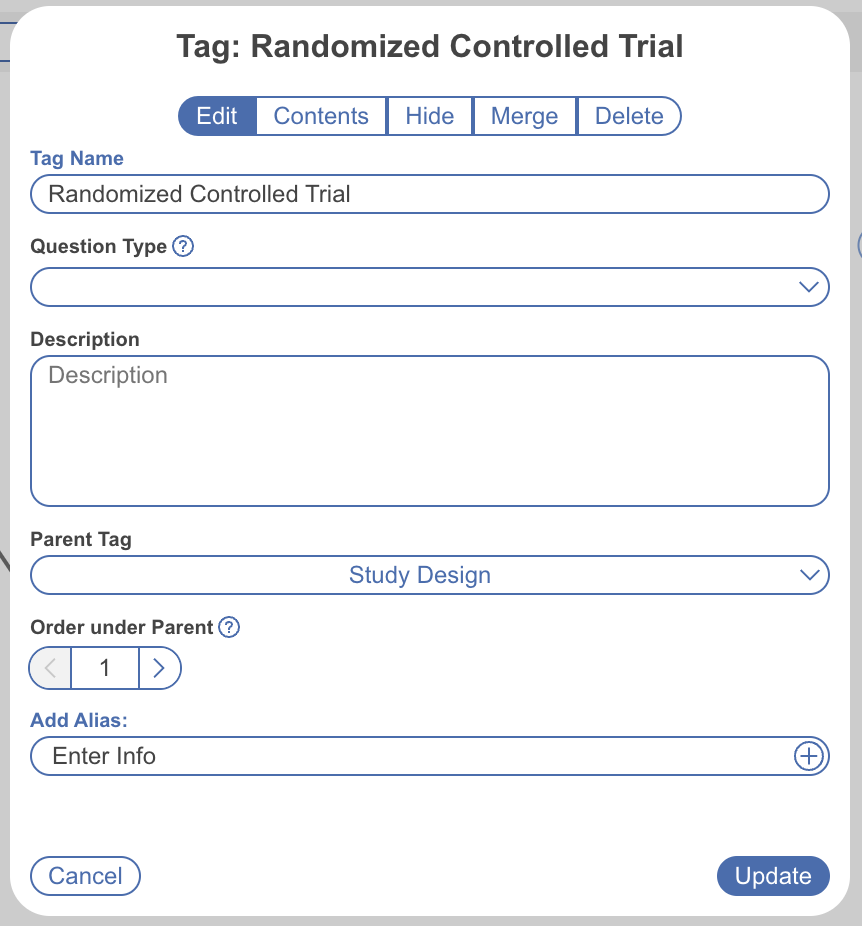
1. Change a Tag's Name
To change a Tag's name, go to the Tag Hierarchy and click on the tag of interest. Click on the tag and rename the title, and then click “Update”. This change will be applied across all studies in the Nest with that tag.
2. Change Question Type and/or Description
To change a Tag's question type, click on the tag of interest, click on the drop-down menu under “Question Type.” To change the question being asked, edit the Question text box and remember to click Update.
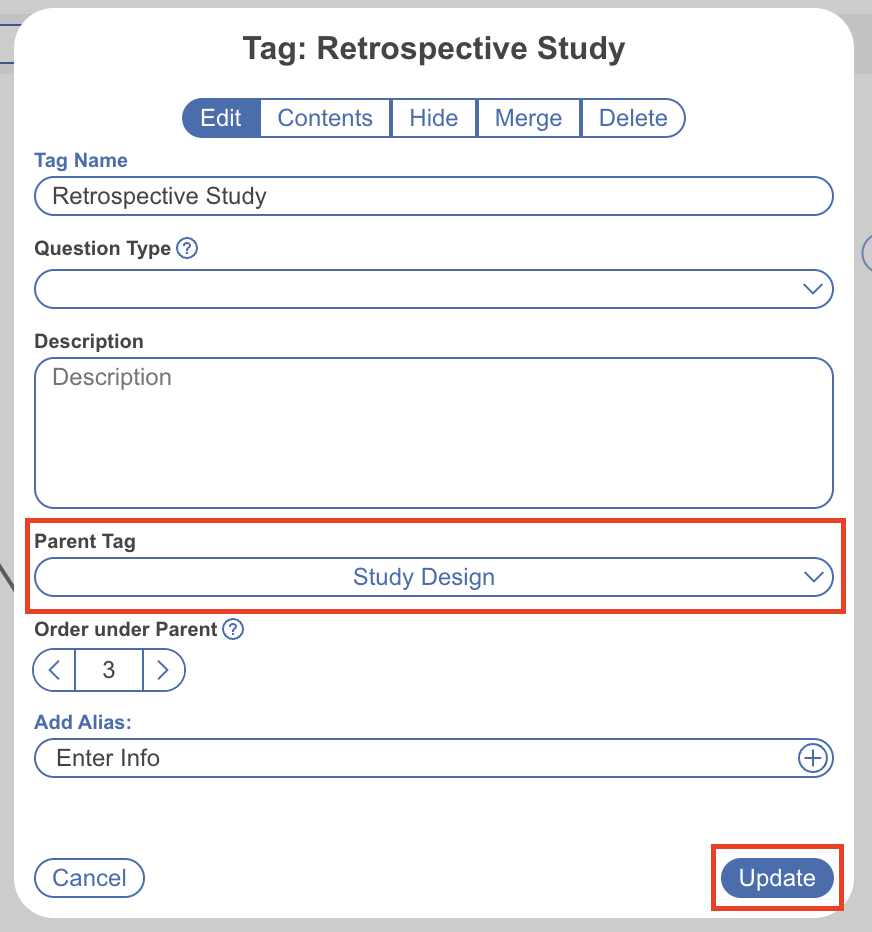
3. Change Parent Tag
Sometimes, you want to move a child tag to be nested under a different parent tag. To do so, click the tag of interest and click on the drop-down menu under “Parent Tag”. Changing this will link the tag under a different parent tag. Find the name of the new Parent tag and click “Update.”
4. Reorder Tags
If you would like to reorder the positioning of tags underneath the parent tag, simply click on the tag you would like to reorder. On the “Edit” menu, use the “Order under Parent” menu to alter the position of the child tag and click “Update.” 1 refers to the left-most tag position under the parent tag and higher numbers refer to consecutive positions to the right of this tag. The new ordering will be reflected in the Tagging module (specifically the order of questions shown in the form) Exports, and Synthesis.
Reordering tags is useful for general organization of the hierarchy, which is reflected in NK outputs, as well as order of questions that appear in Tagging.
5. Tag Contents
When a tag is created, you have the choice of tag content and the choice to toggle on options for your chosen content. The default setting for content mode is Text, meaning when the tag is applied, free text can be inputted alongside. Options for the content mode are switched off by default.
Content Mode: Text vs Tables
If you would like to collect data in the form of a table for a specific tag, instead of just a singular text box, you can select “Table” in the Content Mode dropdown and customize a table. Learn more about when to use text vs tag tables.
Content Options
Once you have chosen the tag's content mode, you may wish to configure options. Turning on options allows you to configure pre-determined options to select from when applying a tag, instead of inputting free text. Learn more about how to configure options.
6. Hide Tags
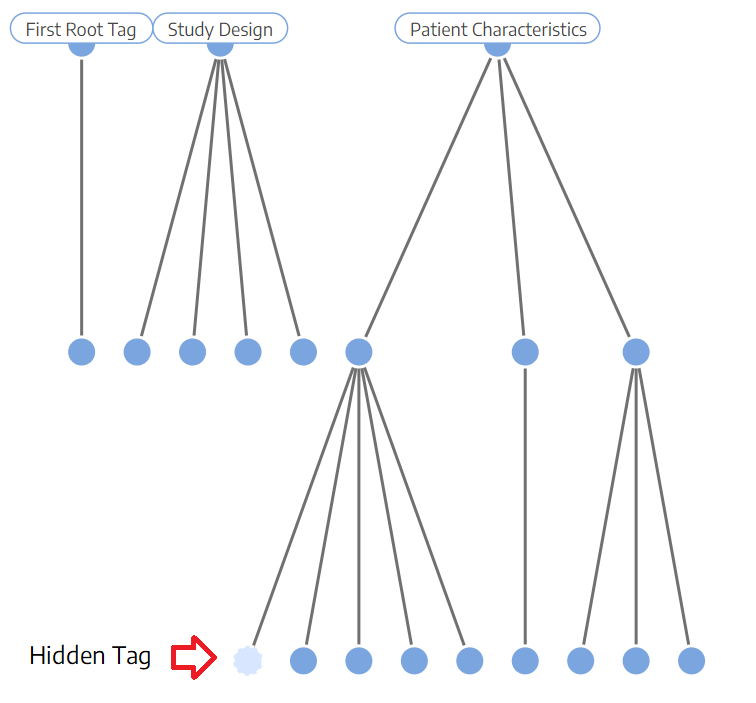
If you have tags present in your hierarchy that you do not want shown in Synthesis (e.g. if they are used for admin/organizational purposes) you can hide them. They will only be hidden in Synthesis and still accessible to use everywhere else in AutoLit. To hide a tag, click on the tag and under the “Hide” menu, toggle on “Hide on Synthesis.”
This will alter the shape of the tag to differentiate between present and hidden tags in Synthesis. Nothing else changes, and toggling back and forth is non-destructive; no data is changed in the process.
7. Merge Tags
If you would like to combine multiple tags into one tag, click on the tag that you would like to merge into the other. Use the “Target Tag” menu to find the tag you would like to merge with and then click the “Merge” button.
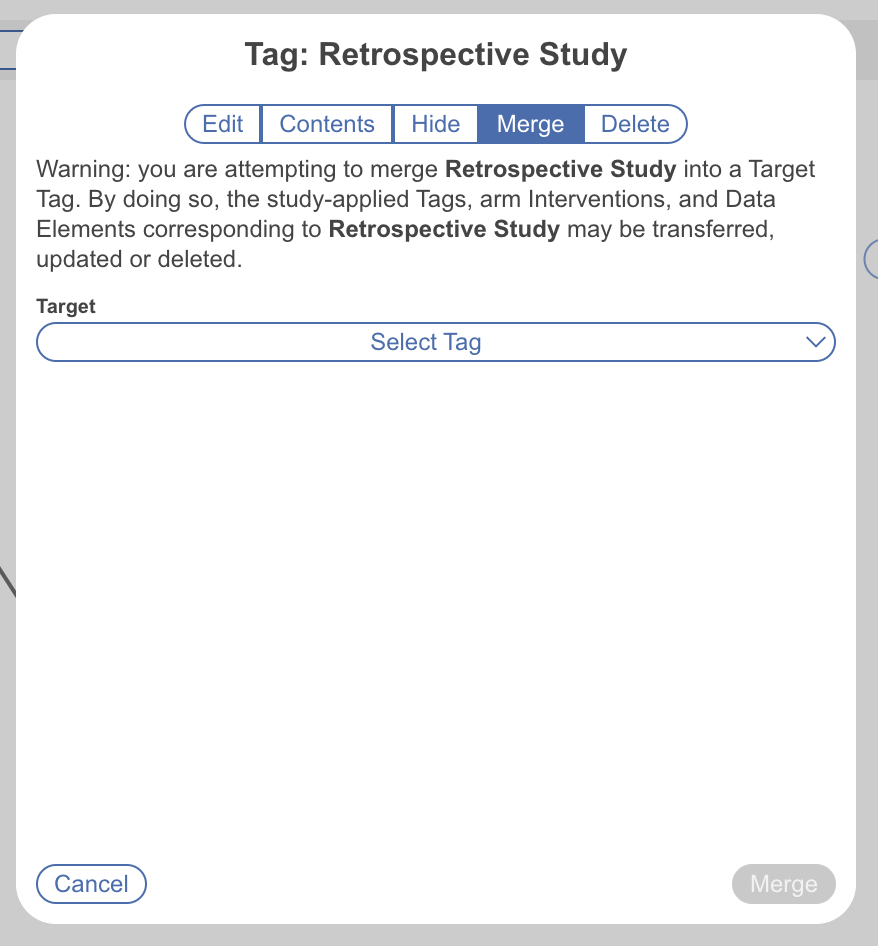
Why would you Merge tags? Either because they are duplicates or because they are concepts you would like to combine.
8. Delete Tags
Find the tag you would like to delete, Click the “Delete” button on the top right, click the “Confirm” square, then click “Update”. When a tag is deleted in Configure Tagging, it deletes the tag from the hierarchy and from all studies it has been applied to.
If you delete a single tag that has children, but do not do delete recursively, the child tags will be reverted to Root Tags and you will need to identify new Parent Tags as relevant.
Deleting tags cannot be undone, so do not delete a tag unless you are certain you do not need it!
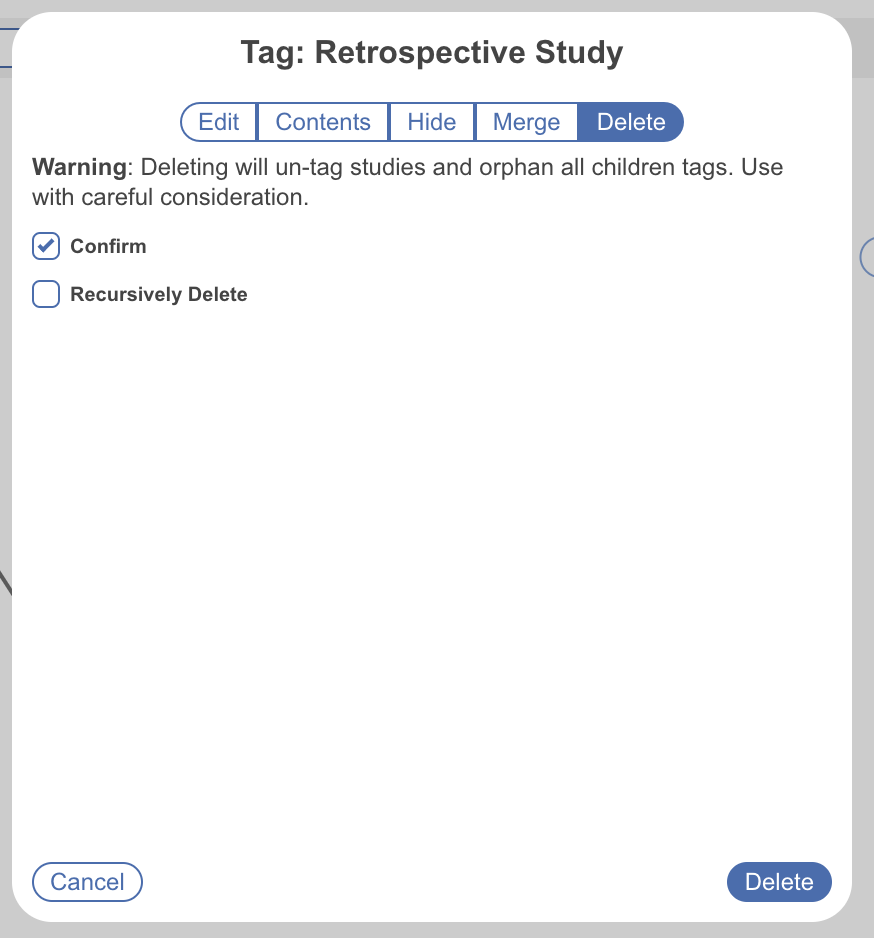
Recursively Delete Tags
In the Deletion modal, you have the option to delete a single tag or to “recursively” delete. Recursive deletion, unlike single-tag deletion, will delete the tag in question as well as all of its child tags.
To Recursively Delete, select the check-box for “Recursively Delete?” and for “Confirm” before clicking “Delete.” As with deleting single tags, this cannot be undone!
9. Add Tags on the Fly
If you forget to configure a tag before beginning the Tagging process, no problem! You can add tags to your hierarchy 'on the fly'; to learn how, click here.