Table of Contents
Study Inspector
The Study Inspector is a search, filter, and edit page for all studies in your nest. From Study Inspector, you can perform any action (Screen, Tag, Extract, or Critical Appraisal analysis) on individual references, and also edit any study's bibliographic information. You can also use Bulk Actions, download/export content from your nest, and use our Exploration tools on studies in the nest.
Finding and Filtering in Study Inspector:
Inspector filters are a way to sort and search all studies within a nest by a given attribute, action performed or position within the workflow. They can be used in tandem with bulk actions to assign an action to a specific group of studies such as bulk exclusion of studies or reviewing metadata of a certain subset of studies.
1. Navigate to the Study Inspector
From the Nest menu, click on “Study Inspector.”
2. Filter the Study Inspector
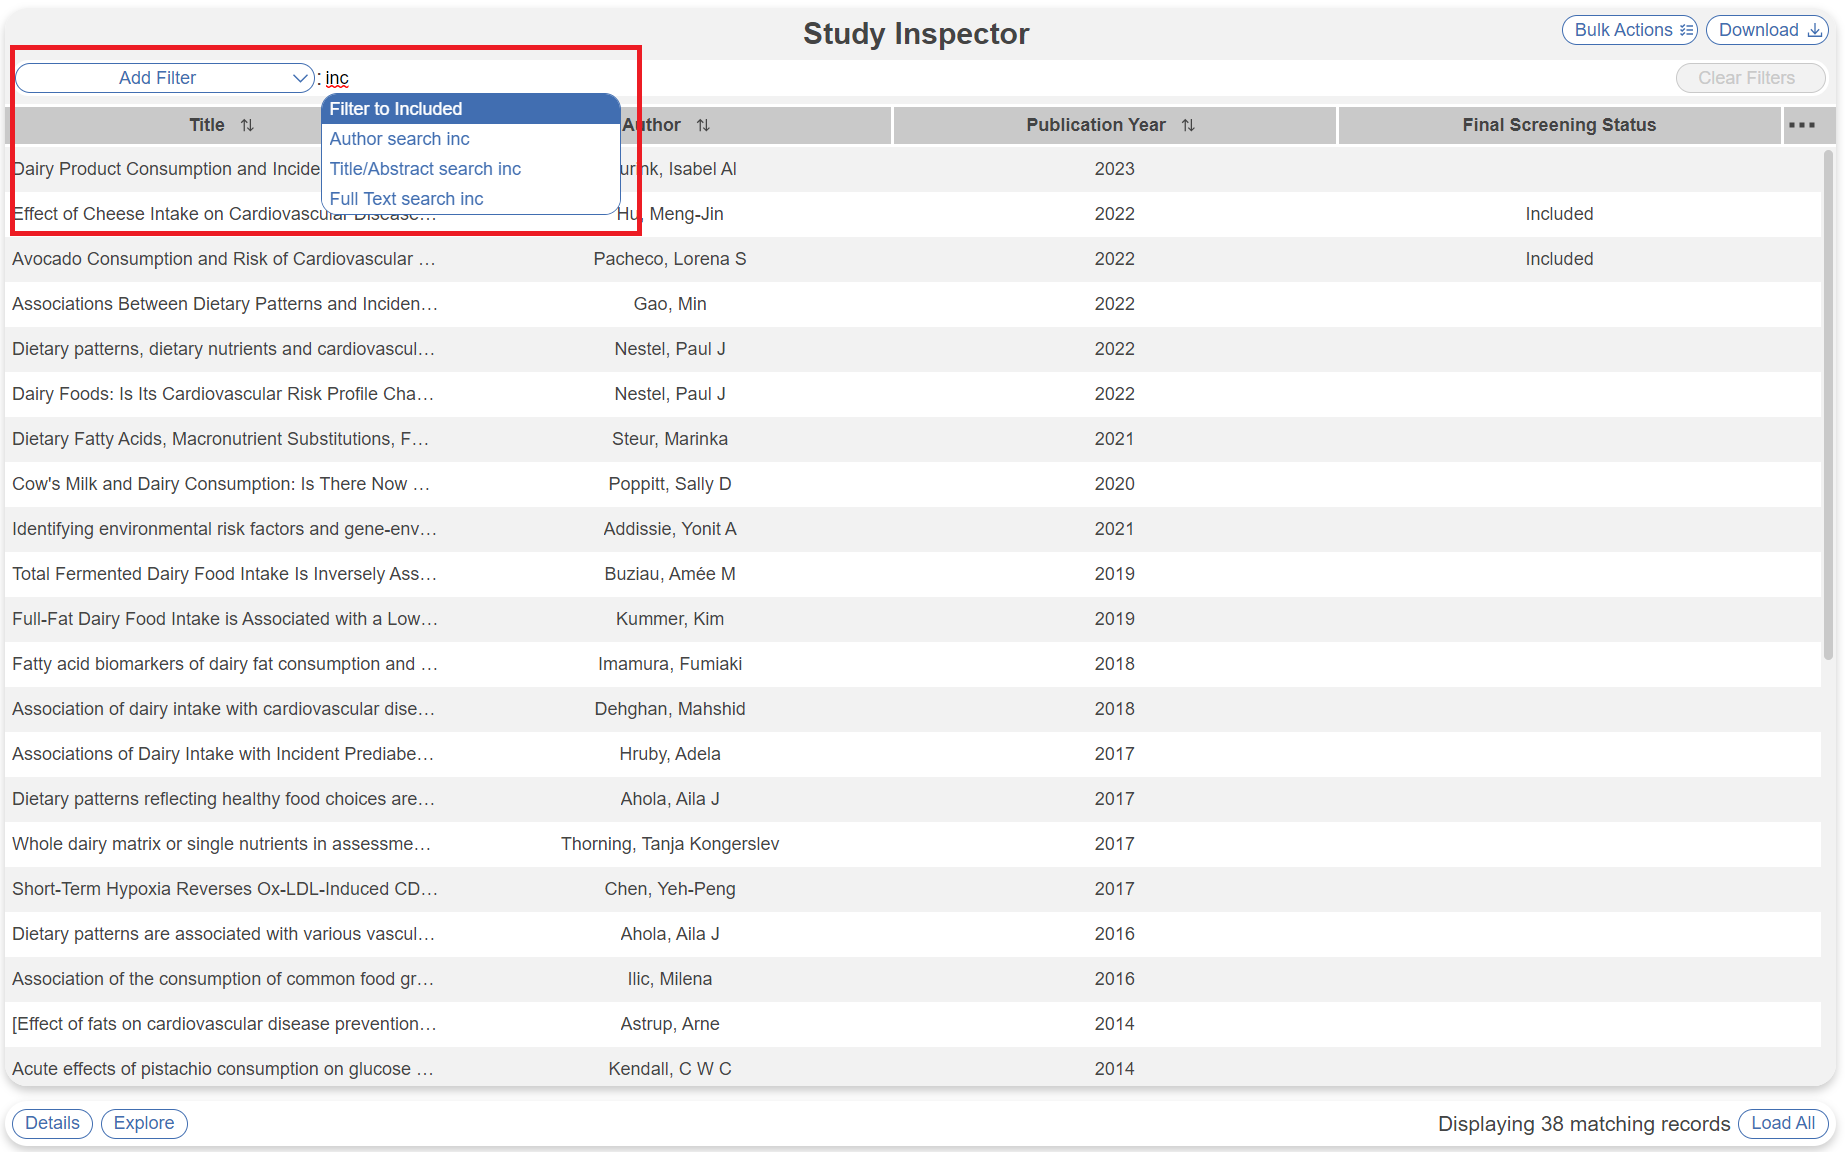
Click on “Add Filter” or begin typing what you would like to filter by. You can filter by TIAB (Title and Abstract text), author, date, status (such as Screening Status, which filters to included, excluded, or unscreened), or tag. The “Add Filter” drop-down enables you to construct your own filter; if you simply start typing in the text box to the right ( red box ), the page will predict the filter you would like to construct, and you can select based on the options presented.
You can use multiple filters, which are layered on top of each other (e.g. filtering to “Screening Status: Included” and “Title/Abstract: Randomized” will filter to all included articles with the word “randomized” in the title or abstract). Filtering the Study Inspector also enables you to use Bulk Actions on the studies to which you have filtered. For a detailed list of the types of filters available, check out the Study Inspector Filters page.
Adjusting the Columns in Inspector
You can select the columns that you want to view in Inspector by clicking on the three dots to the far right of the Inspector header row. Any columns you select will be added to the Inspector view and, if you wish to Download data, these columns are alsoadded to the spreadsheet.
Click on any of the following to add them as columns in Inspector:
- Title
- Author
- Abstract
- Publication Year
- Journal
- Volume
- Issue
- Pages
- Publication Type (if available in the bibliographic data)
- Time of Retrieval: This refers to the date the record was imported into the nest.
- Final Screening Status
- If Dual mode is turned on you will see the following filters:
- Your Screening Status: This refers to the screening decision you made for the record
- Screening Adjudicated By: The user's name that adjudicated the record is displayed
- Reviewer Screened By: The users' names that reviewed the record are displayed
- If Dual Two Pass mode is turned on, you will see the following filters:
- Your Full Text Screening Status: This refers to the FT screening decision you made for the record
- Abstract Screening Status: This refers to the final abstract screening decision made for the record
- Your Abstract Screening Status: This refers to the abstract screening decision you made for the record
- FT Screening Adjudicated By: The user's name that adjudicated the record after FT screening is displayed
- Reviewer FT Screened By: The users' names that reviewed the record at the FT level are displayed
- AB Screening Adjudicated By: The user's name that adjudicated the record after Abstract screening is displayed
- Reviewer AB Screened By: The users' names that reviewed the record at the abstract level are displayed
- Tagging: This refers to Complete or Incomplete module status
- Extraction: This refers to Complete or Incomplete module status
- Critical Appraisal: This refers to Complete or Incomplete module status
- Inclusion Probability: If turned on, this refers to the calculated inclusion probability for the record
- Tags: Alist of tags applied
- DOI
- PubMed ID
- Embase ID
- External ID
- NCT ID
- Ref ID: This refers to the number in which the record was imported into the nest (where 1 was the first)
- Full Text Status: This refers to if and how the Full Text was uploaded
- Author List
- Full Citation (JAMA format)
- Related Report Family: If the record is part of a related report family, the name will be displayed
Click on any column that has a check mark next to it (indicating it is a current column) to remove it. Make sure to avoid adding too many columns to limit crowding!
Quick Guide: Download and Bulk Actions
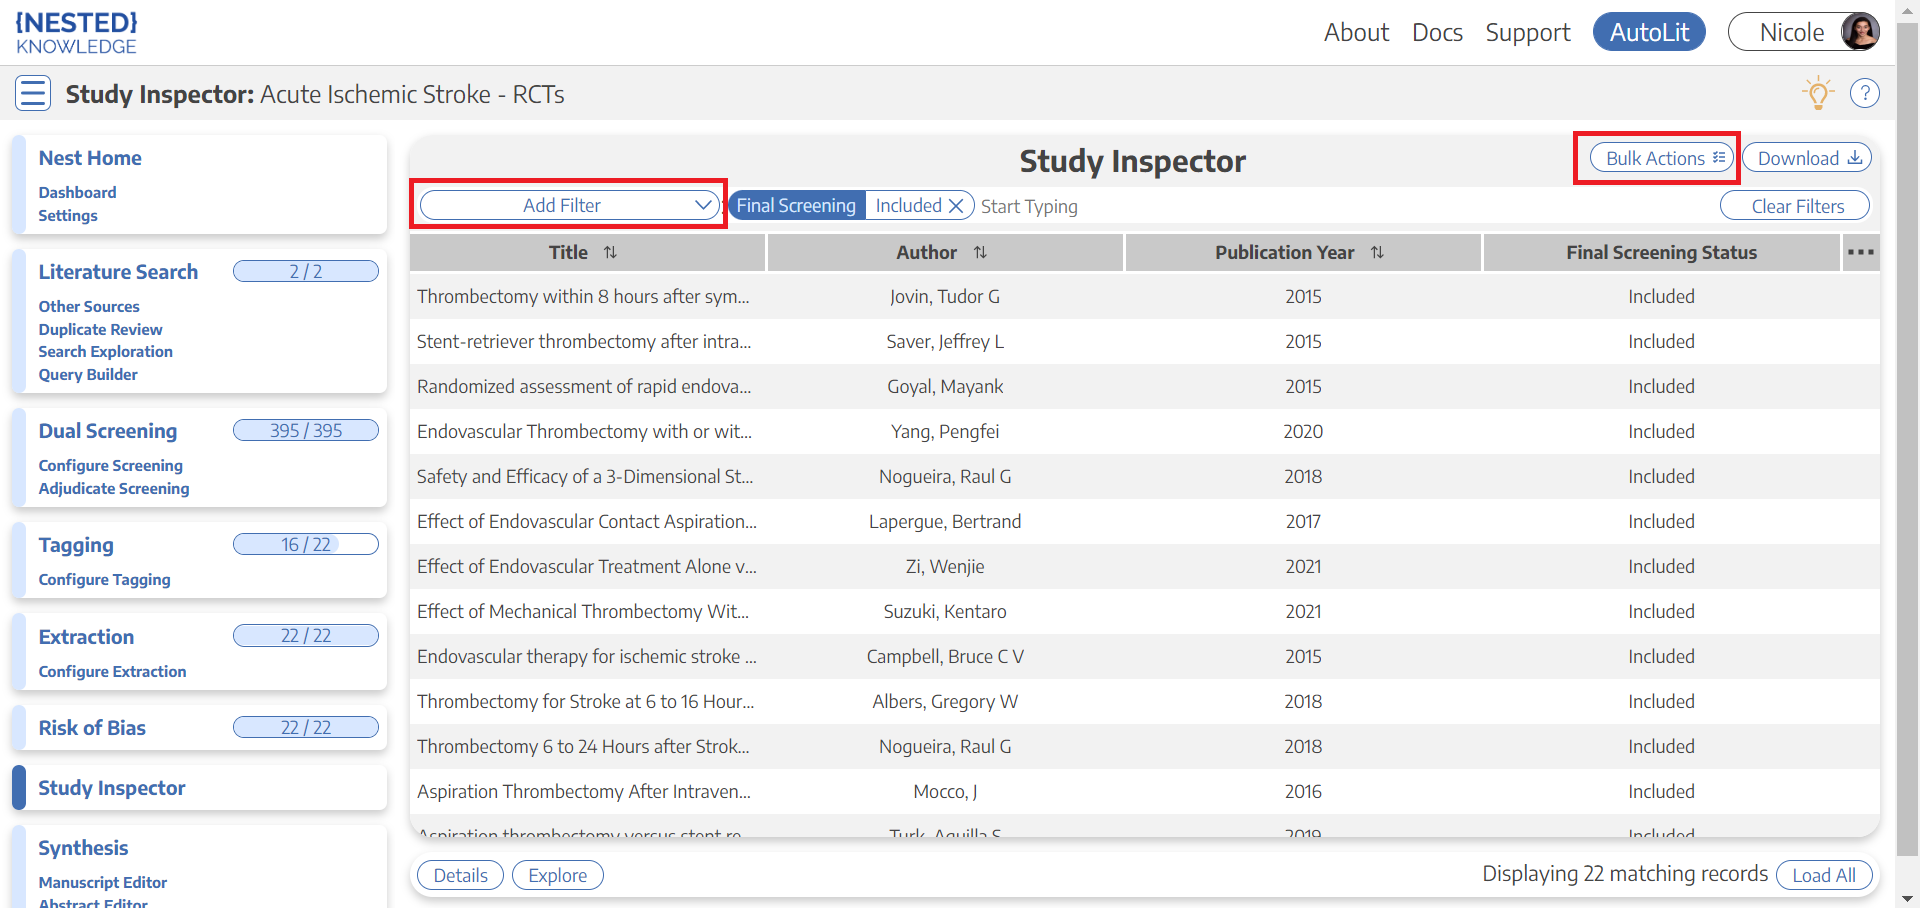
Inspector is the location for two very important activities: Downloading/exporting and completing Bulk Actions.
Download from Inspector
Download enables you to download content from your nest–either for all studies, or for a specific set of studies you filter to. For full instructions, see here.
Quick Guide:
- First, apply all filters to determine which records will be exported.
- Then, make sure that you have the Columns in Inspector you want exported. The Inspector columns will all be exported into any CSV output!
- Only once filters and columns are ready, Click Download in the upper right.
- Select the content that you want exported (e.g. to get metadata, click Studies. to get tags, click Tags).
- If relevant, provide any other details (e.g. if you want a RIS file for Studies instead of a CSV, or whether you want Tables to export for Tags).
- Click “Download” within the modal. Your file should appear in your local Downloads!
Bulk Actions
Bulk Actions allow you to complete certain steps (changing screening status, uploading full texts, editing module status, etc.) on studies; for full instructions, see here.
Quick Guide:
- First, apply all filters that narrow in on the studies you want to complete an action on! If you 'bulk act' before filtering, you will execute the action on a wider range of studies than intended.
- Then, click Bulk Actions in the upper right.
- Select your Bulk Action of interest – e.g., if you want to bulk-alter Screening Decisions, select “Update Screening”.
- If Updating Screening, Tags, Module Status, or importing Full Texts, follow the instructions in the modal. For example, if altering a Screening Decision, you may need to select “Full Text Screening” and “Final Decisions” if you are in Dual, Two-pass mode.
- Complete the bulk action and wait for the job to complete. Optionally, you can click out of the progress modal; the job will continue in the background.
Completing Actions on Individual Studies in Inspector
1. Opening the Study Modal
Once you have filtered to the list of studies of interest, you can screen, tag, or extract by clicking on the study in question; this opens the Study Modal. The modal opens to the module that was selected as the preset; so, if you opened the Screening Study Inspector, for instance, you will be able to screen the study in question.
2. Completing Actions
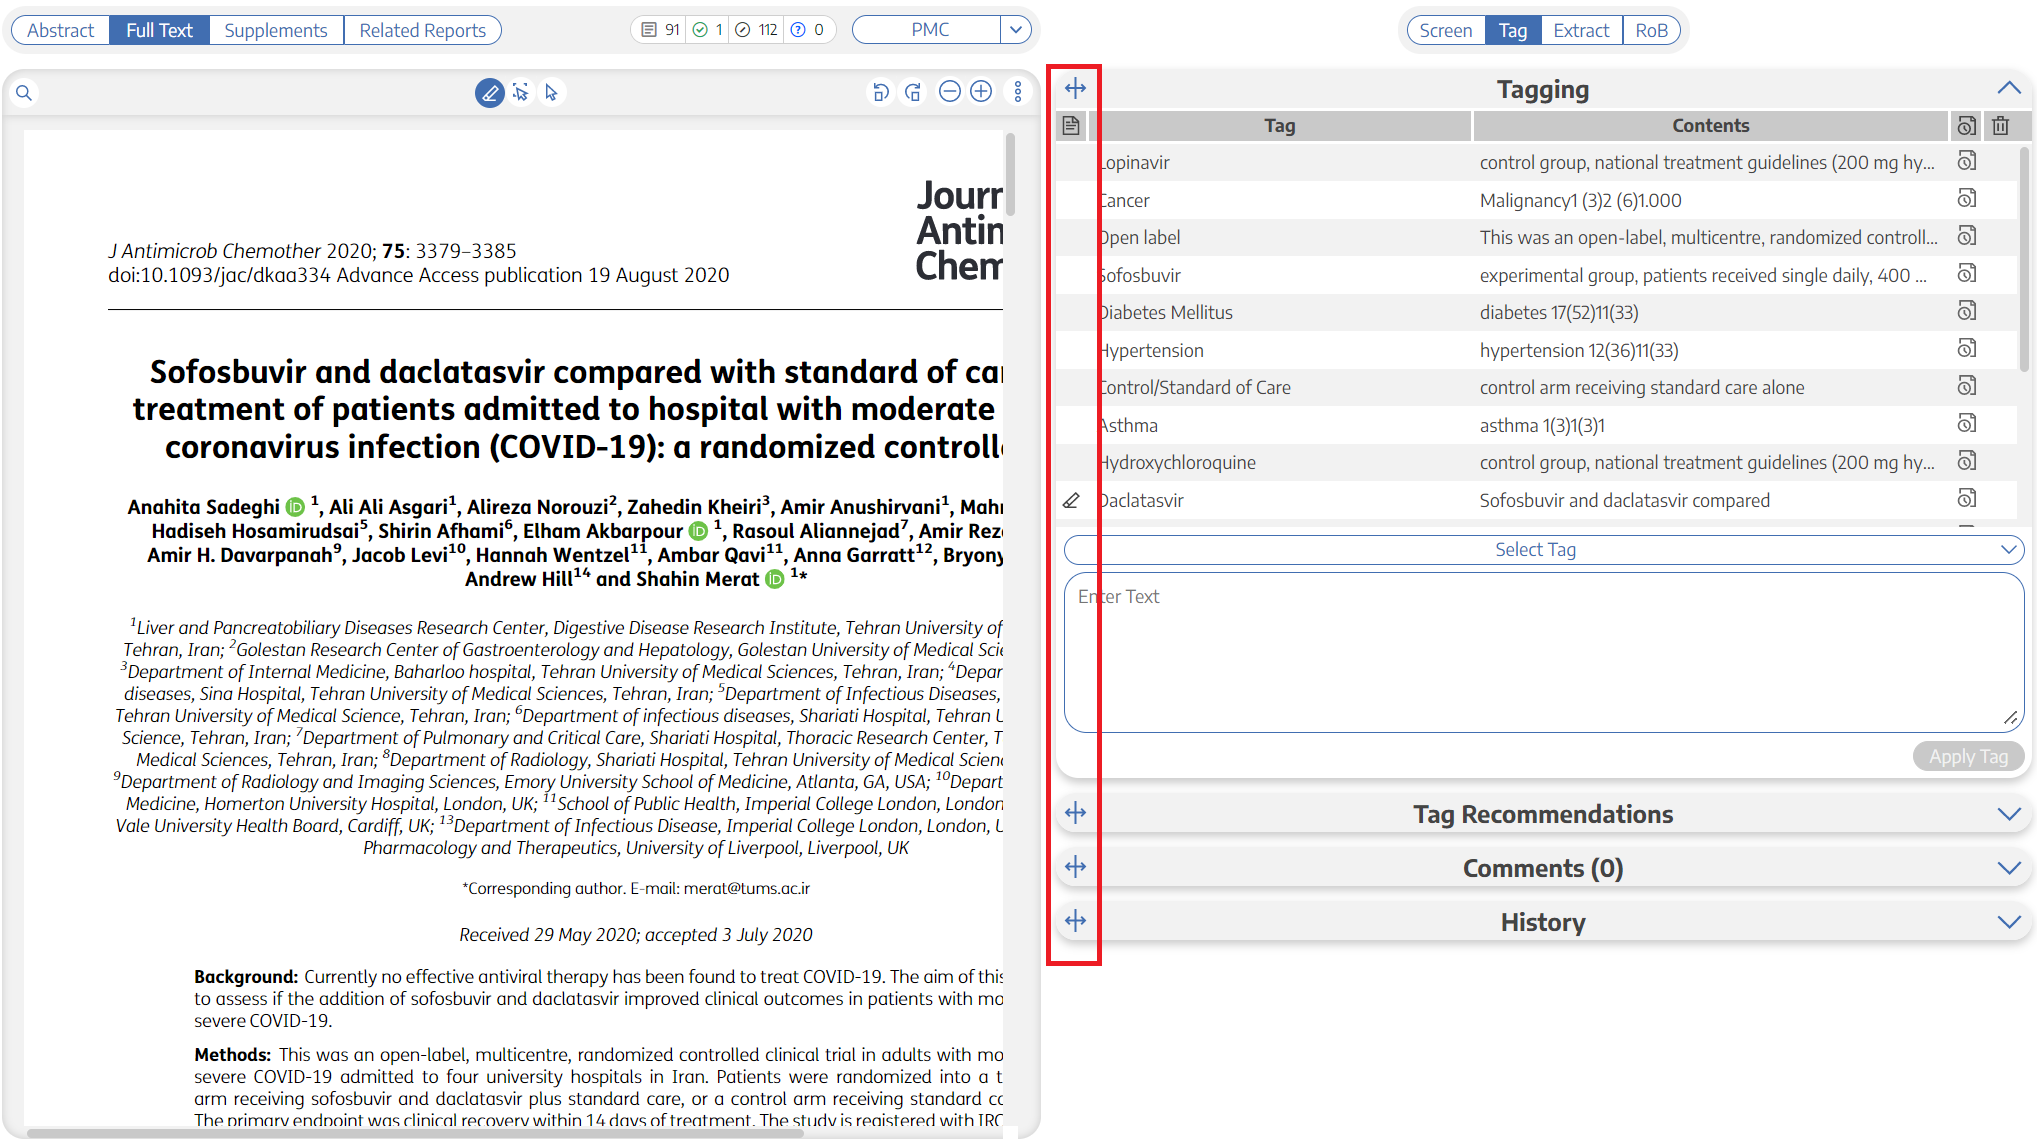
The modal enables you to Screen, Tag, and MA Extract the study that you have opened. In the modal, the actions are completed in the same way they are completed in the sequential screen/tag/extract modes. Here, you can see a study that is opened to the Screening module; the screening actions ( red square ) indicates that this study has been included. Once you complete an action, you can click the arrow keys to the left and right of the modal ( red circles ) to move up and down the list of studies available in Study Inspector.

You can unscreen a single study by going to Study Inspector and then opening the screening tab in the Study Modal. If you click on the “i” icon next to the screening decision, you can “unscreen” that study to put it back in the screening queue to review later. 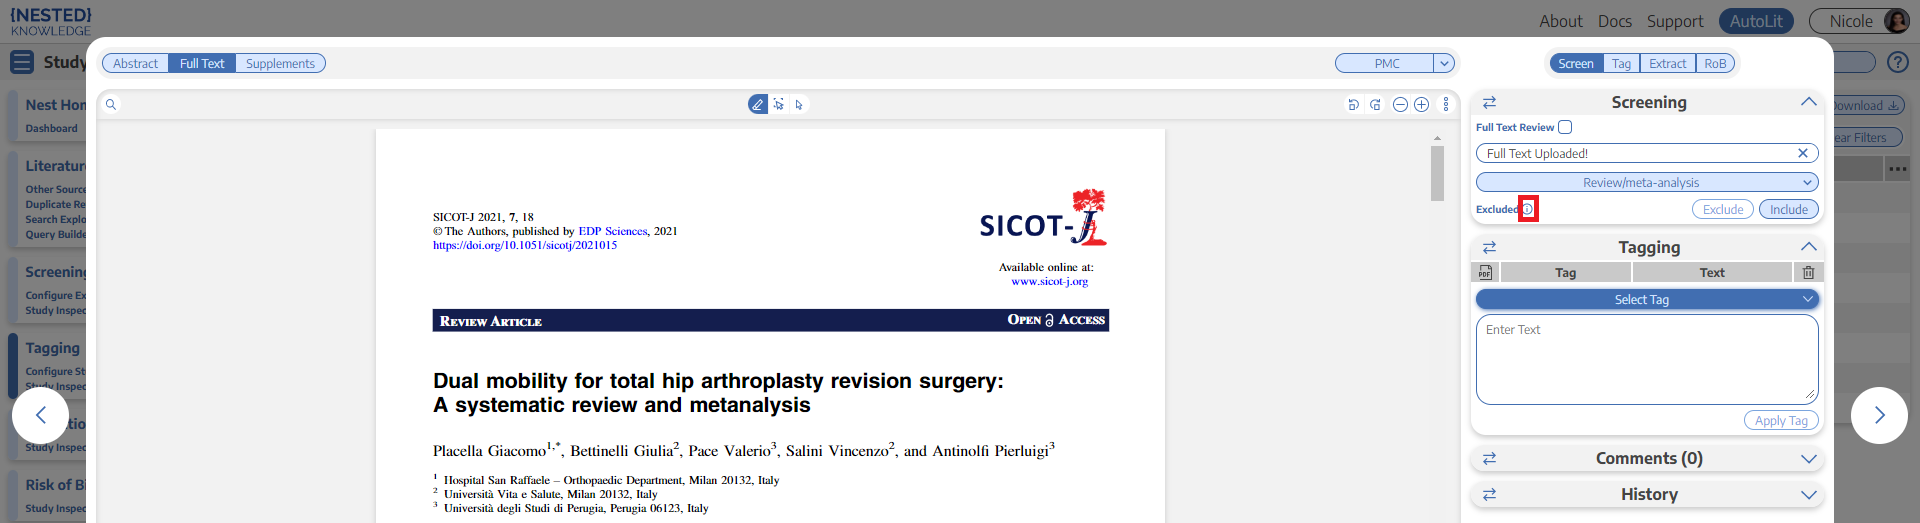
3. Toggling Modules
To switch between modules, toggle the buttons in the upper right of the modal ( red outline ). Regardless of how you opened Study Inspector, you can Screen, Tag, and/or Extract within the modal. Note: If the Nest is in Dual Screening mode, you will have a fourth option of Adjudication shown as a toggling option (black outline) if you have Admin privileges; this page is not available to users.
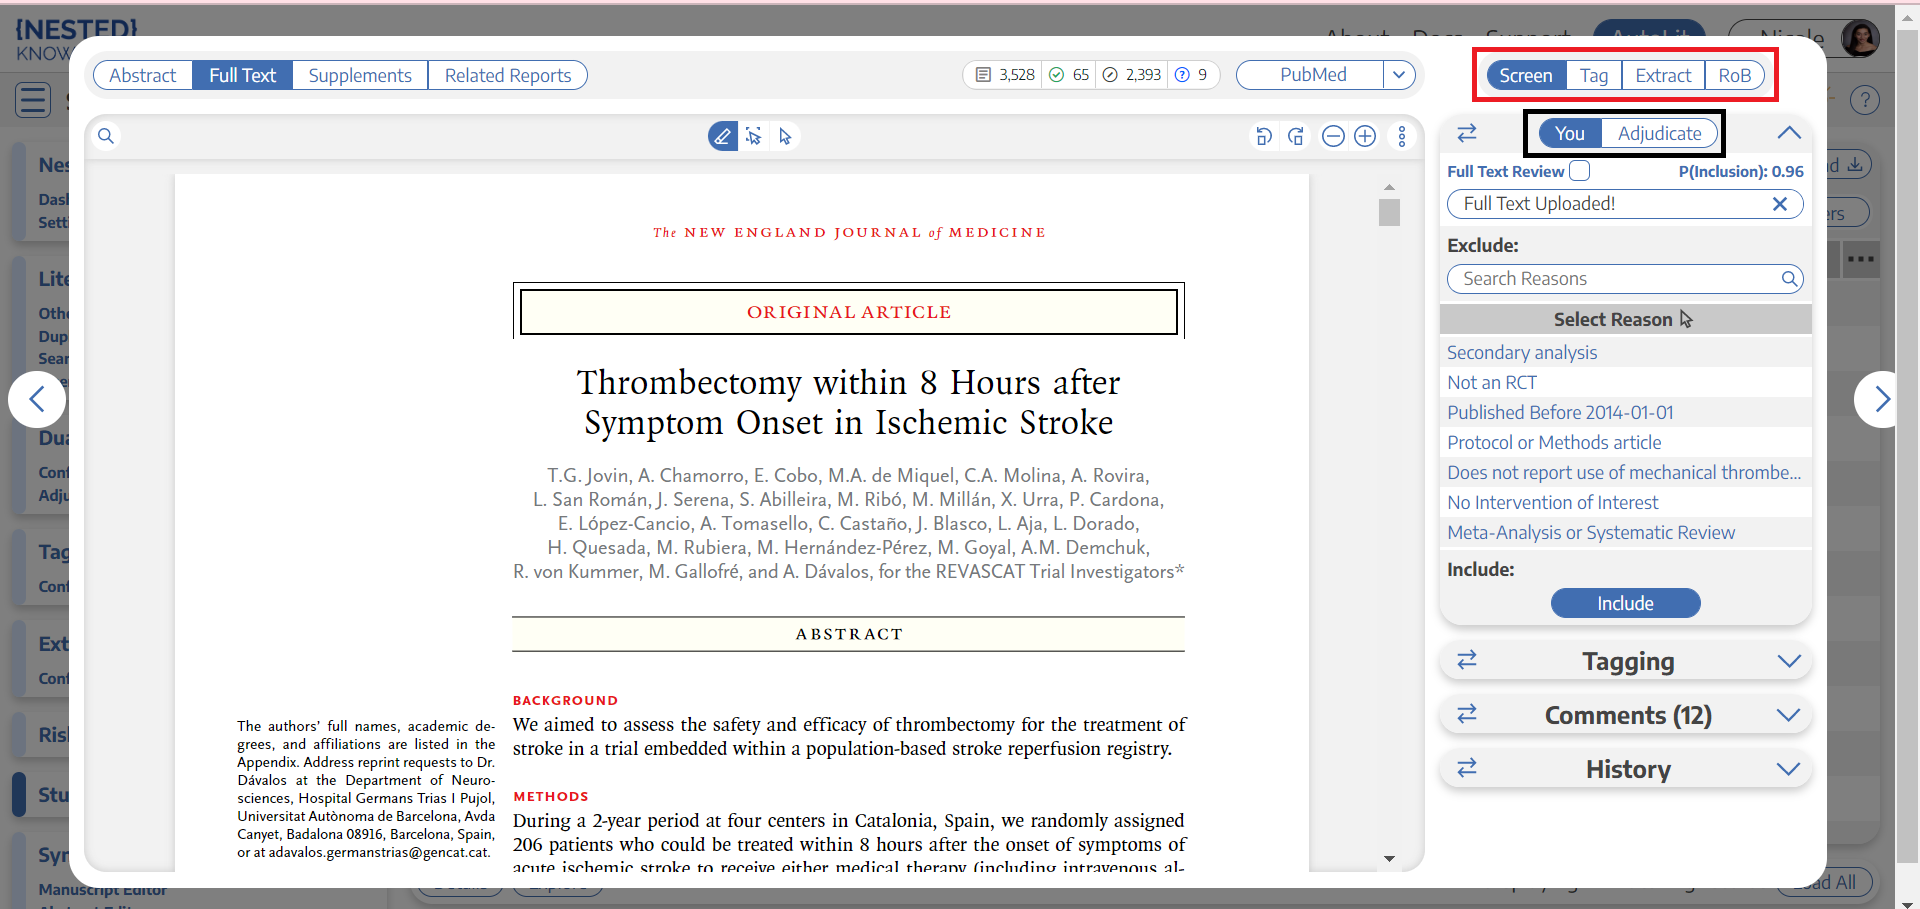
Warning: If the Nest is in Dual Screening mode, changes made in the Screening module will not alter the final/adjudicated Screening Status of the study. Instead, the change will queue another user screening decision to be adjudicated. To alter final/adjudicated Screening Status from the Study Modal, an Admin must use the Adjudication module to select a finalized option.
5. Marking Modules Complete/Incomplete for Individual Records
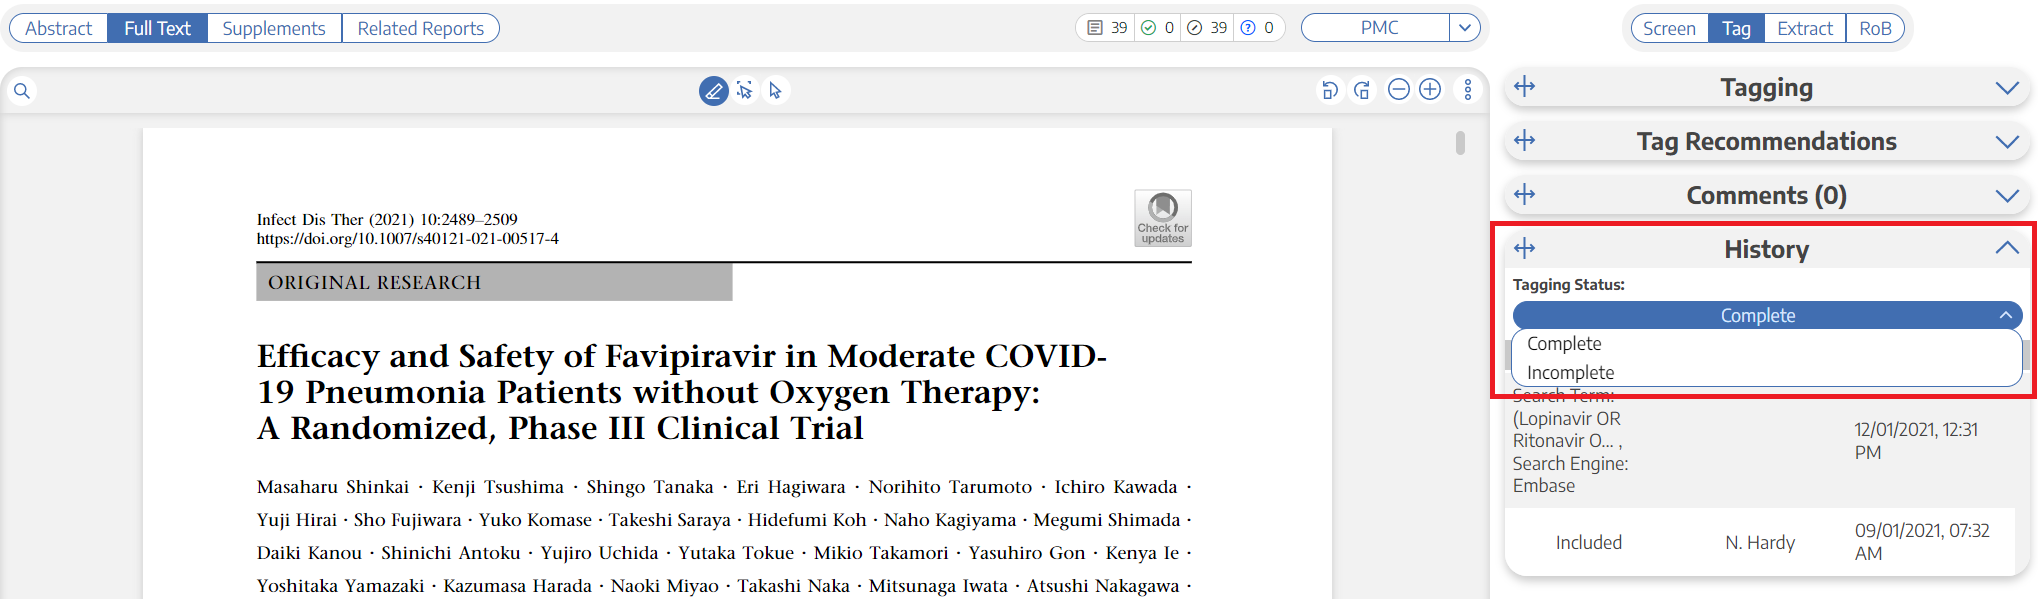
Marking a module “Complete” removes it from the queue in the corresponding module and marking a module “Incomplete” puts the record back into the queue in the corresponding module. Regardless of module status, records are always editable in Study Inspector. This is specific to the Tagging, Extraction and Critical Appraisal modules.
To do this, you can filter to a group of studies and use Bulk Actions (above) and you can also do this within individual studies. Under each menu, open the “History” tab, select Module Status Dropdown and select Complete or Incomplete.
6. Edit Bibliographic Information
To edit the bibliographic information associated with a study, find it in Inspector. In the Abstract view, select the “Edit” button next to the Bibliographic Fields. In the modal that pops up, edit any of the Bibliographic Fields.
7. Using Nested Knowledge's Reference ID (Ref ID)
Nested Knowledge automatically generates a Ref ID for every record that can be used for filtering, bulk actions, and allocation. See details here.
Explore from Inspector
If you have questions about the contents across your included records, you can use Explore from Inspector, where the RoboPICO, Topic Modeling, and Keyword frequency can be applied to any subset of studies from your nest.

Note: Anytime there is a module box with the adjustable icon, you can drag to adjust the width of the box depending on your preference.