Nested Knowledge

Bringing Systematic Review to Life

User Tools

Site Tools


wiki:practice

This is an old revision of the document!


Efficacy of Drugs for Heart Failure

Project Intro:

Your client, the Boston Institution for Reviewing Drugs (BIRD), has posed the research question, “ How do the existing pharmacological therapies for heart failure with reduced ejection fraction compare with respect to safety outcomes: mortality, serious adverse events, cardiac events?”

BIRD has asked you to create a living systematic review to answer this question. BIRD would like you to create a nest reviewing randomized controlled trials of all current, up-to-date (published after 2010) therapies for treatment of heart failure with reduced ejection fraction (HFrEF). There are several drugs used for treatment including the following classes: angiotensin converting enzyme inhibitors (ACEi) and angiotensin receptor blockers (ARB). In recent years sacubitril/valsartan, a drug in the class of angiotensin receptor neprilysin inhibitors (ARNi), appears to be the most efficacious therapy for treatment of HFrEF. BIRD would like you to pay particular attention to trials investigating sacubitril/valsartan as well as trials investigating other therapies.

Step 0A: Background research

Tasks:

  1. Don't know what heart failure is or what reduced ejection fraction means? YouTube it!
  2. Never heard of ACEi, ARB, ARNi and/or valsartan/sacubitril? Google it!
  3. Want to understand the mechanism behind the drug? Google is your best friend. 😊 Also, feel free to try other resources such as UpToDate.

Step 0B: Nest Initialization

Getting Started

Tasks:

  1. Log into Nested Knowledge. If this is your first time, create an account.
  2. Read the Protocol, to familiarize yourself further with the criteria for the review process.
    1. Focus on the PICO of the review. This stands for Population, Interventions, Comparisons and Outcomes. When it comes to looking through papers during screening, it will be important to look for all four factors in order to include a trial in your review. More about PICO in Step 1.
  3. Create a new nest to get started on this research question.
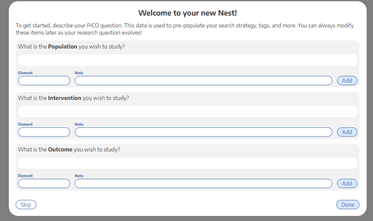
  4. Click skip when this pops up: (More on this later!)

Add a nest description

Tasks:

  1. Navigate to Admin-\>Edit Nest Description
  2. Add a description that lays out the research question that will be addressed in this review. Why might a researcher care about heart failure with reduced ejection fraction? Why is valsartan/sacubitril a drug of interest? What contextual information is important to convey? This description will be similar to the Background section in the protocol with greater focus on the importance of the goal of the nest/review and the bigger picture.

Copy the Protocol

Tasks:

  1. Copy the Nest Protocol from the original nest.
  2. Add anything you'd like to make this protocol more complete.

Invite Users and Admins

Tasks:

  1. Invite Users. From the “Admin page” add additional collaborators by entering their name or email address. To add someone to a nest, they must have an existing AutoLit account.
  2. Invite Nicole Hardy, Ranita Tarchand and Kevin Kallmes. Make us admins.

Admin and Owners have permission to add other Users. Admins may also edit the protocol and nest description. Users can conduct literature searches, screen, modify exclusion reasons, tag, and extract data.

Step 1: Understanding the Protocol

  • Hopefully, you've read the protocol by now. When reading the protocol, you should be focusing on the PICOs.
  • Here is the PICO for this nest based on the protocol:

  • Note: while the client has a particular interest in sacubitril/valsartan, remember that we still want to look for other drug interventions! They could also compare to placebo or sacubitril/valsartan or even other drugs.
  • Now that you know the PICOs of this project, you can start building a search!

Tasks:

  1. Add a search using Literature Search that returns \<300 results. (Hint: Use the PICO I gave you. 😊)
    1. Typically you should include key words indicating the type of study you’re looking for, the patient population and specific interventions if you know them. Whereas including specific outcomes of interest or “placebo” may make your search too broad.
    2. When structuring your search, utilize quotation marks “” to search for specific word pairings, parentheses () to group similar words separated by the OR function, and separate grouped words by the AND function.
      1. Hint: Look up if there are alternative names for any words of interest and include them in the search using the OR function. For example, (ARNi OR sacubitril/valsartan)
    3. Why <300? A good research question should be focused and narrow. If your search is returning >500 studies, it might be that your search and research question are too broad.
  2. Set the search to run every month.
  3. Play around with Search Exploration to weed out what terms are most commonly used in papers surrounding this topic. Use these terms to create better literature searches.
  4. Add a search you create from search exploration.
  5. Add these papers manually:
    • 32865377
    • 32978755
    • 31475296
  6. Bonus task: Learn how to search using wildcards and how to limit by date, publication type or other fields in pubmed! This link might also help.

Step 3: Screening

Configure Exclusion Reasons

For this project, you should only include randomized controlled trials. Exclude in vitro studies, editorials, case series, and secondary analyses. Exclude studies that do not show patient outcomes, such as protocols.

Tasks:

  1. Once you are in your nest, go to the Configure Exclusion Reasons.
  2. By clicking “Add Manual Exclusion,” you can configure any reason to exclude a study. These options will be offered in the drop-down of exclusion reasons during screening. Note: Some exclusion reasons can be automated such as publication date. This is done through using “Bulk Actions” and here is a loom video with instructions on how to exclude by publication date. Bulk Actions is a great tool but proceed with caution as it is the fast track to ruining a nest. Only exclude by publication date for now and we will discuss this in more depth later.

Screen Sequentially

Tasks:

  1. Click Screening in the panel on the left-hand side.
  2. Read the title and abstract of the study and include or exclude according to the criteria defined in the protocol.
  3. If the abstract contains insufficient information to decide, (sometimes the outcomes of interest are not obvious or included in the title/abstract so it’s best to check the full text when in doubt), select “View Study Source,” which links through to the PubMed site or the DOI of the article. - If you don't have access to the full text, message us via email (include the PMID you're searching for) or try Sci-Hub. If you still cannot find it, after reaching out to us, add the exclusion reason “Full Text Unavailable”. - After reviewing the article, if you determine it should be excluded, select an appropriate exclusion reason, then hit “exclude.” - If you want to include the study, upload a full text PDF of the study to the nest, accessible either through PubMed or an online library subscription, check “Full text review” and hit “include.” - Screen at least 30 studies. Don’t stop until you have at least 6 included studies. If you have screened 30 studies and haven’t yet included at least 6 studies, stop and check in with us. This may be because your literature search may have produced results that are too broad or too specific. - Once you have 6 included studies, click here:
  4. Then, click here:
  5. Once it's done loading, click done and refresh the page.
  6. You should now see a probability instead of “train inclusion model.”
  7. This tells you the probability of inclusion (in this case) is 3%.
  8. Bonus task: Click on where it says P(inclusion) and look at the graph. See if you can understand what it means!

Note: You can add a new exclusion reason on the fly by typing in the exclusion reason box then selecting add.

Step 4: Tag Studies

Building a Tagging Hierarchy

Tasks:

  1. Under the tagging menu, go to “Configure Tagging.”
  2. Guidelines for creating tags can be found below , but you may modify the tagging hierarchy according to what topics are most relevant to your disease or intervention
  3. Add Root Tags: A root tag is a tag that has no “parent”. Root tags can be added by clicking “Create New Tag” and typing in the Tag name, without selecting a parent tag.
    1. Add the following “baseline root tags” (in this order from left to right):
      1. Study Type
      2. Patient Characteristics
      3. Interventions
      4. Outcomes
  4. Add Child Tags(non-root): All tags that are not roots must have a parent tag. Add them by clicking “Create New Tag” and typing in the tag name, and then select a parent tag from the drop-down.
    1. Add these child tags to study type:
      1. RCT
    2. Add these child tags to Patient Characteristics:
      1. Age
      2. Sex
      3. New York Heart Association (NYHA) functional classes
      4. Left ventricular ejection fraction (LVEF)
    3. Add these child tags to Interventions
      1. Placebo
      2. Sacubitril/valsarta
      3. Empalgliflozin
    4. Add this child tag to Outcomes
      1. Serious Adverse events (SAE)
        1. Add this child tag to SAE
          1. Symptomatic hypotension
      2. Clinical Outcomes
        1. Add these child tags to Clinical Outcomes:
          1. All-cause mortality
          2. i. Cardiovascular death

Note: Here is a loom video that should help you create your hierarchy.

NICOLE INSERT LOOM VIDEO

Applying Tags

Tasks:

  1. Click on Tagging in the panel on the left-hand side.
  2. Apply the tags to all studies.
    1. Keep in mind when you apply a tag you want to add relevant text that is the source of the tag. For example, if you tag NYHA class in the study, you will want to write the table you found it in or copy and paste the sentence where they talk about it.
    2. Note: Aren't you glad you uploaded all the full texts in the screening stage? That's why we have you upload full texts while screening.

For a complete list of suggested tags, see useful tags. If you are still unsure what terms to use as tags:

  • Explore the search exploration page to find frequently appearing words and phrases.
  • Explore other, related nests and examine their Tagging Hierarchies
  • Consider the general categories of interest (patient characteristics, outcomes, etc)

Note: Here is a loom video that should help you apply tags.

Loom Video on Applying Tags

Step 5: Extract Data

Configure Data Elements

Tasks:

  1. Using these instructions, configure the following data elements as continuous (mean/SD). Here is a helpful loom video too!
  1. Age
  2. LVEF
  3. Configure the following data elements as categorical:
  4. Sex
  5. NYHA class
  6. Configure the following data elements as dichotomous:
  7. All-cause mortality
  8. Cardiovascular death
  9. Symptomatic hypotension
  10. Configure interventions hierarchy as shown in Part A in the instructions.

Note: Here is a loom video you should check out. It should help you configure your hierarchy properly.

NICOLE INSERT LOOM VIDEO

Extract Studies

Tasks:

  1. Click on Extraction and follow the instructions to extract data in all the studies.
  1. Note: Median and mean are not interchangeable. IQR and range are not interchangeable. Standard deviation (SD) and standard error (SE) are not interchangeable!

Note : Here is a loom video that should help you extract data.

Step 6: Wrapping Up

Qualitative Synthesis:

  • This link talks about qualitative synthesis. This is a good place to check to see how your tagging looks.

Tasks:

  1. Play around with this. Click on the slices and see what happens. What relationship does this diagram have with the tagging hierarchy? Compare them and see!

Quantitative Synthesis:

  • This link talks about quantitative synthesis. This is a good place to check to see how your extraction looks.

Tasks:

  1. Play around with this. Look at different data elements. Do the data make sense? Are there any numbers that seem out of place (too high or too low?) Go back and check these numbers for errors.
  2. Play around with the NMA and see if you can figure out what the numbers mean.

Study Inspector:

Tasks:

  1. Click on Study Inspector in the left-hand panel and play around with it. Things to think about:
  1. Why are there 3 different places to click study inspector? Does it matter which one you click? What happens if you click the study inspector in screening vs. tagging vs. extraction?
  2. Play around with the different filters!
  3. Learn how to save a filter and see what this does.
  4. DO NOT DO ANY BULK ACTIONS. Your manager will provide guidance on bulk actions.

Other Things to Play Around with:

Dashboard

  • Under Nest Home, click Dashboard. You will be able to see your progress on the nest. Play around with this tool.

Manuscript Editor

  • Under Synthesis, click on manuscript editor. Start your manuscript. Play around with the different tools in this feature.

Export

Comments

  • You can leave study level and nest level Comments. Tag your manager in a nest level comment and a study level comment.

Dual vs. standard screening

  • In our software, you can dual screen. Learn about this here! Find where in our software you can configure the nest to be dual screened. (Hint: It's in Admin.)

Risk of Bias (ROB)

  • In our software you can also conduct ROBs. This one is a big one and we'll conduct separate trainings on this. For now, review this page in the wiki, and google SIGN ROB to familiarize yourself with it. Don't spend more than 30 minutes googling; we are going to train you on this later.

Download this file! hf_practice_nest2.docx

wiki/practice.1644353327.txt.gz · Last modified: 2022/02/08 20:48 by nicole_hardy_alumni.brown.edu